LUSH
LUSH User Manual
Chapter 1 Product Information
1.1 Product Description
The LUSH workflow is an optimized pipeline based on GATK best practices. Its main components include the aligner, bqsr, variantCaller, genotyper, and report tools from DCS Tools. The workflow features data alignment, quality control, and variant detection. Users can manage the analysis process through the graphical interface of the DCS Cloud, which simplifies parameter input and result output. The workflow utilizes high-performance server configurations and parallel task execution to shorten the analysis cycle, enabling fast and efficient delivery.
1.2 Precautions
- This product is intended for research purposes only and not for clinical diagnosis. Please read this manual carefully before use.
- This manual and the information it contains are proprietary and confidential to the BGI Research. Without written permission from BGI Research, no individual or organization may reprint, reproduce, modify, disseminate, or disclose any part of this manual to others. The readers of this manual are end-users authorized by BGI Research. Unauthorized use of this manual is strictly prohibited.
- BGI Research makes no warranties of any kind regarding this manual, including (but not limited to) implied warranties of merchantability and fitness for a particular purpose. BGI Research has taken measures to ensure the accuracy of this manual. However, BGI Research is not responsible for errors or omissions and reserves the right to make improvements to this manual and the workflow to enhance reliability, functionality, or design.
- All images in this manual are schematic diagrams. There may be slight differences between the images and the actual interface. Please refer to the actual interface for accurate representation.
Chapter 2 Product Introduction
2.1 Analysis Flowchart
The LUSH workflow is an optimized pipeline based on GATK best practices. Its main components include the aligner, bqsr, variantCaller, genotyper, and report tools from DCS Tools. The workflow features data alignment, quality control, and variant detection. Users can manage the analysis process through the graphical interface of the DCS Cloud, which simplifies parameter input and result output. The workflow utilizes high-performance server configurations and parallel task execution to shorten the analysis cycle, enabling fast and efficient delivery.
The workflow includes the following functions:
- Data Alignment: Align sequences to the reference genome and generate alignment statistics.
- Variant Detection: Analyze sample mutations, including SNPs and INDELs, based on alignment results.
Figure 2-1 The analysis flowchart:
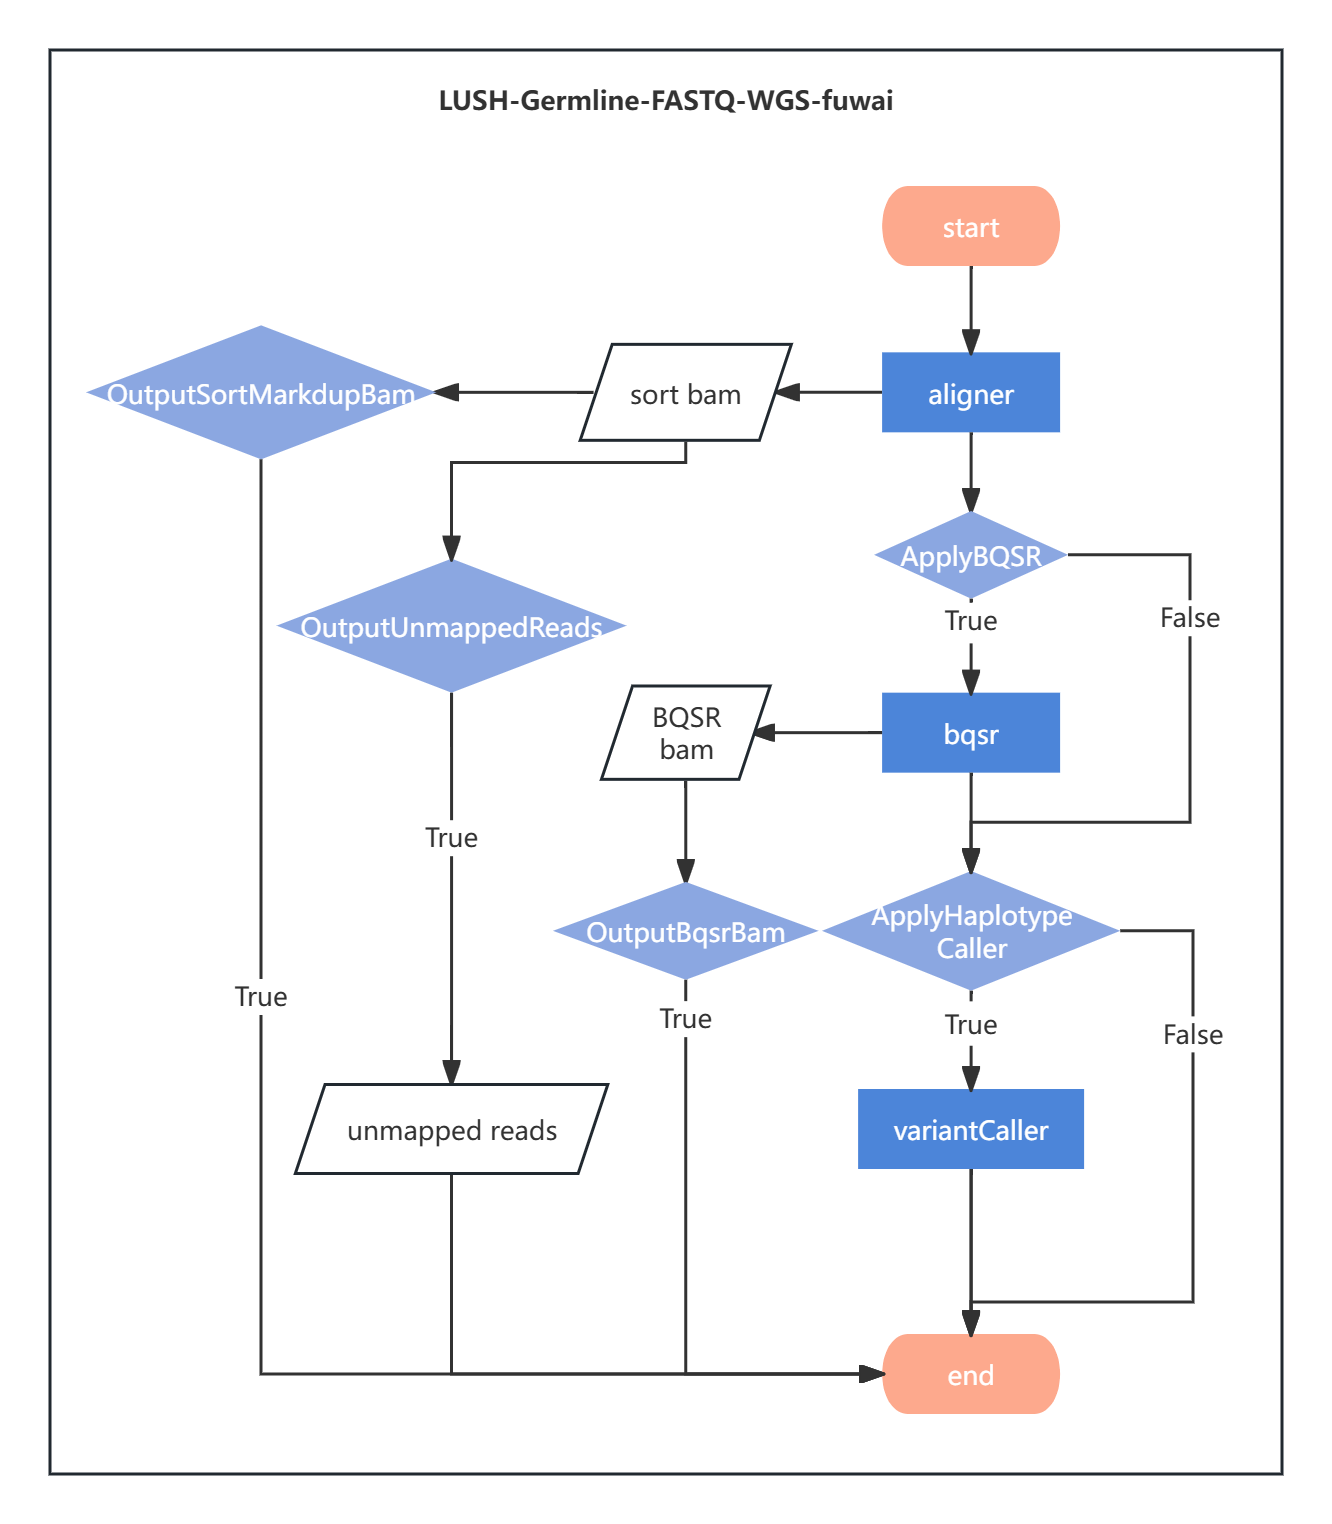
2.1.1 Reference Genome Filtering, Alignment, Sorting, and Deduplication
Sequences are aligned to the reference genome to determine their positions, providing a foundation for variant detection. Duplicate sequences generated by PCR amplification are marked and removed to reduce false positives and improve variant detection accuracy. These steps are performed by the aligner tool. Additionally, the aligner integrates data quality control functions to filter and process sequences before alignment, reducing error rates and avoiding interference from noisy data in subsequent analyses.
2.1.2 Base Quality Score Recalibration (BQSR)
Due to systematic errors, the quality values of sequence bases are not always entirely accurate. The base quality values need to be recalibrated. This step corrects systematic biases, generates more accurate quality scores, improves variant detection accuracy, and reduces false positives and false negatives. The standardized quality assessment aligns with GATK-recommended best practices and is performed by the bqsr tool.
2.1.3 Variant Detection
The variantCaller is a C/C++ reimplementation of GATK HaplotypeCaller, and the genotyper is a C/C++ reimplementation of GenotypeGVCFs. The variantCaller tool is used for variant detection, generating GVCF files, while the genotyper tool produces Genotype VCF files.
2.1.4 Report Generation
The report tool consolidates statistical files output from previous tasks, generating images and HTML reports.
Chapter 3 User Manual
The LUSH standard analysis workflow is managed end-to-end through the DCS Cloud, from sample input to result output. Below is a detailed operational guide for using the LUSH standard analysis workflow on the DCS Cloud.
3.1 Guide Overview
3.1.1 Overview
This chapter explains how to use the LUSH standard analysis workflow. Before use, please read and understand the content to ensure correct usage of LUSH.
3.1.2 Workflow Suite
- LUSH_Germline_FASTQ_WGS_Human
- LUSH_reference_index
- LUSH_Germline_FASTQ_WGS_NHS
- ExpansionHunter_WGS_STR
- CNVpytor_WGS_CNV
- PanGenie_WGS_SV
3.2 Use Case 1: LUSH Main Workflow - Manual Submission
The operation consists of four steps: uploading data, adding a workflow, LUSH2 reference genome index construction, and LUSH2 analysis. After running the task, when the task status displays ![]() "completed," the task is finished.
"completed," the task is finished.
3.2.1 Step 1: Upload Data
- Click the left navigation bar [Data], enter the data management page, navigate to the target folder, and click the upper-right corner [+ Add files] - [Tool upload] to upload data (Figure 3-1):
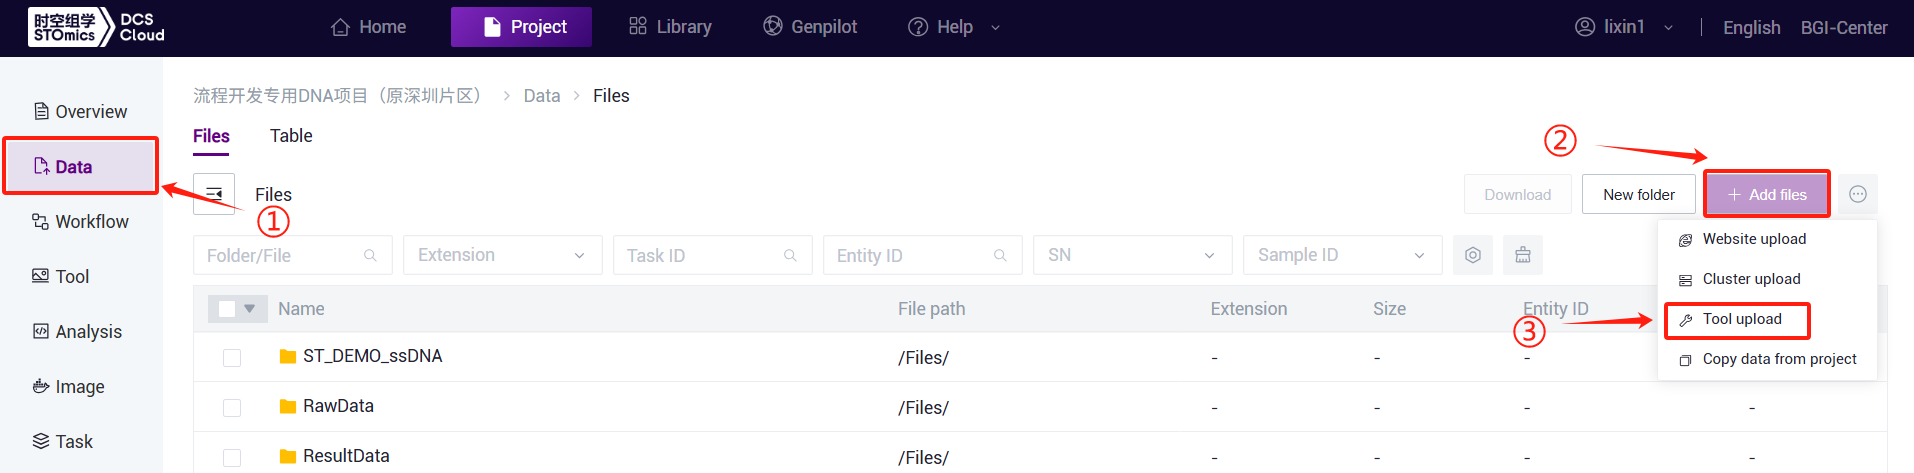
- This feature is exclusive to the overseas AWS environment of the cloud platform. It allows users to utilize AWS tools to upload local files or folders to the cloud platform.
On the Data Management Files page, click the "Add file" button. Select "Tool upload" to access the tool upload interface. The steps are as follows:
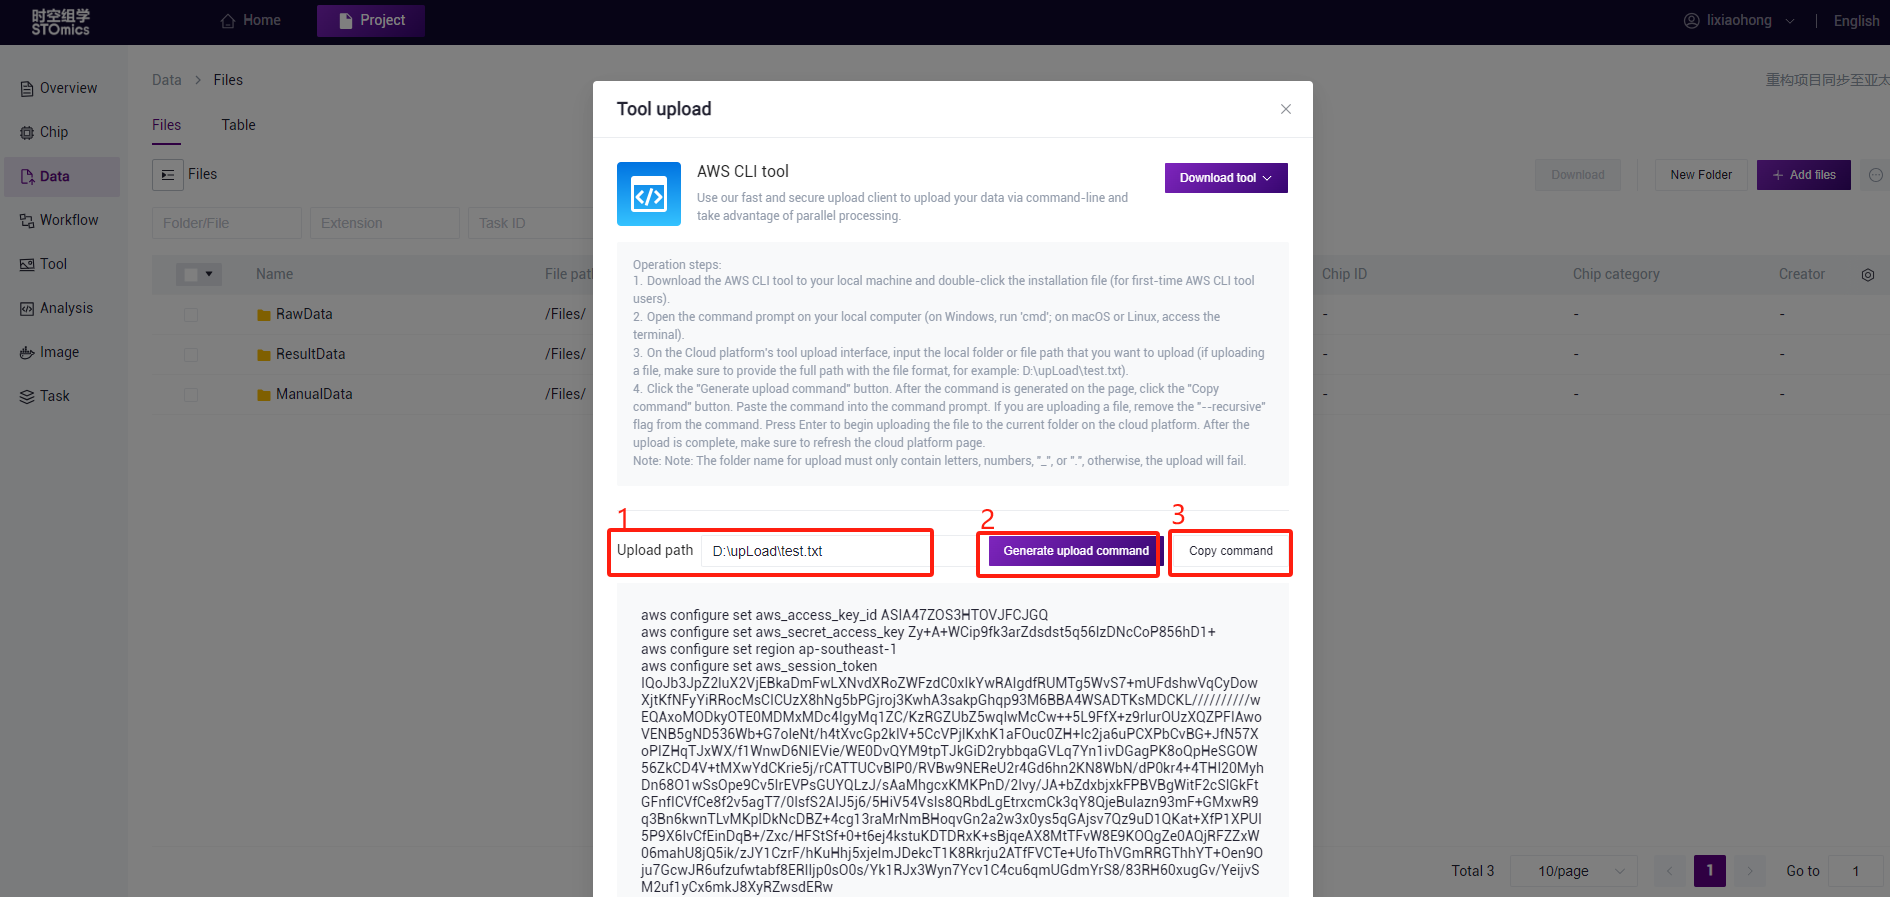
Download the AWS CLI tool to your local machine and double‑click the installation file (for first‑time AWS CLI tool users).
Open the command prompt on your local computer (on Windows, run 'cmd'; on macOS or Linux, access the terminal).
On the Cloud platform's tool upload interface, input the local folder or file path that you want to upload (if uploading a file, make sure to provide the full path with the file format, for example: D:\upLoad\test.txt).
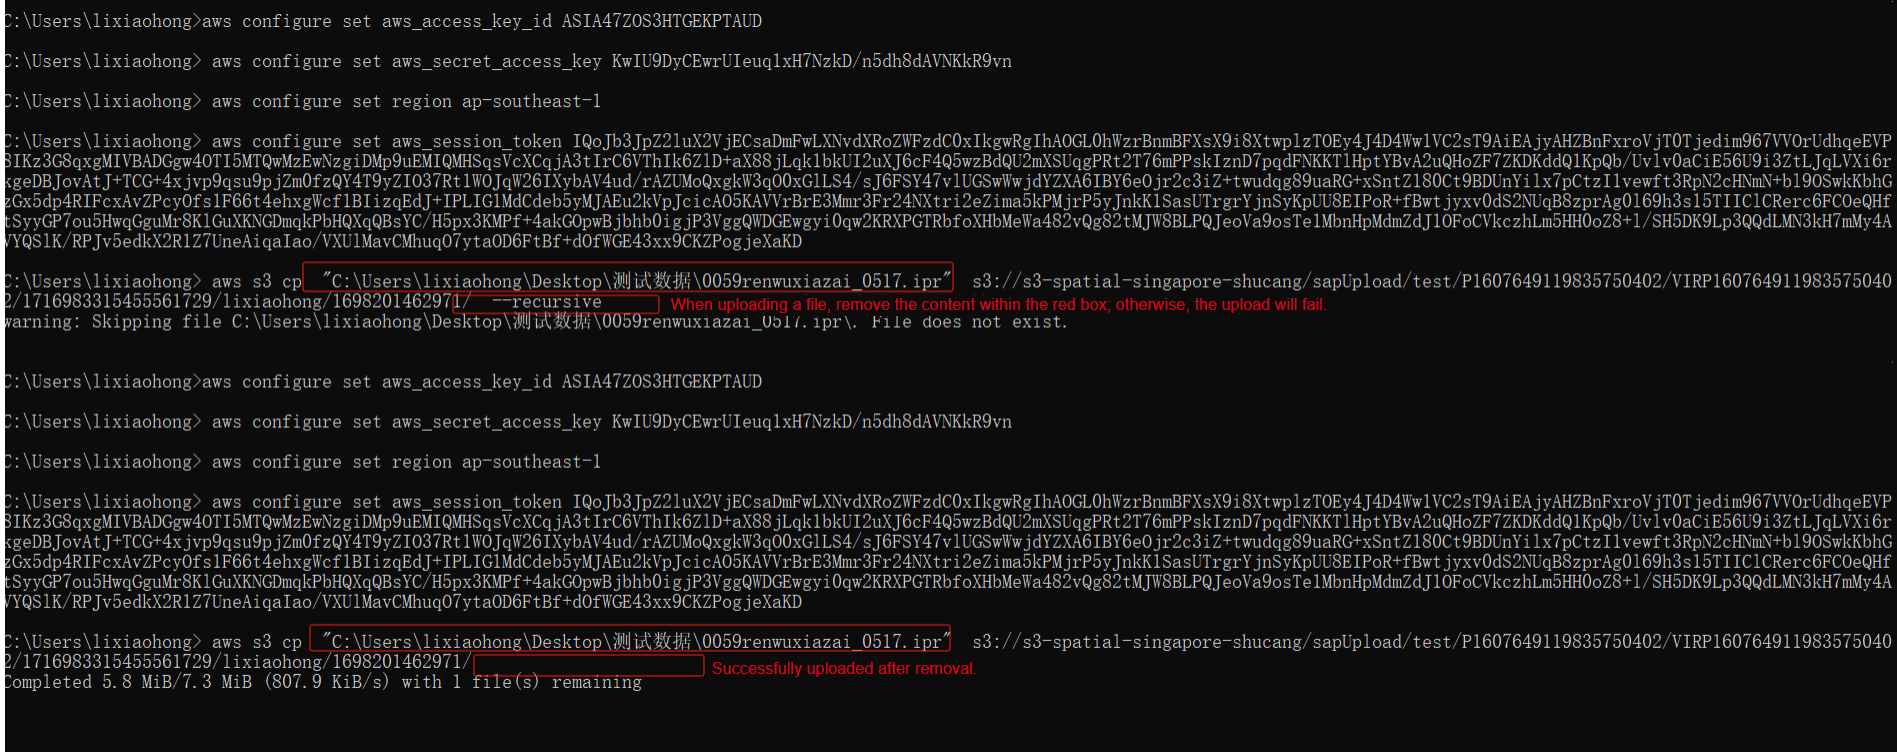
Click the "Generate upload command" button. After the command is generated on the page, click the "Copy command" button. Paste the command into the command prompt. If you are uploading a file, remove the "‑‑recursive" flag from the command. Press Enter to begin uploading the file to the current folder on the cloud platform. After the upload is complete, make sure to refresh the cloud platform page.
3.2.2 Step 2: Add Workflow
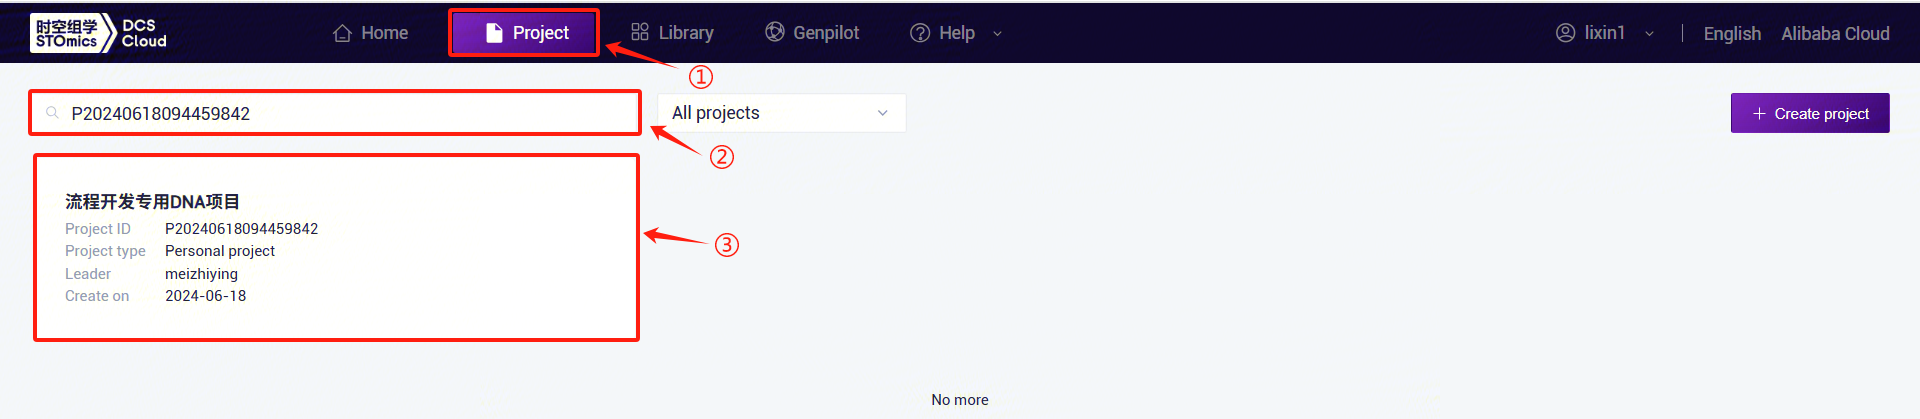
- Click the top navigation bar [Project] to enter the project list page. In the search box, enter the project name/project number and click to enter the project (Figure 3-3):
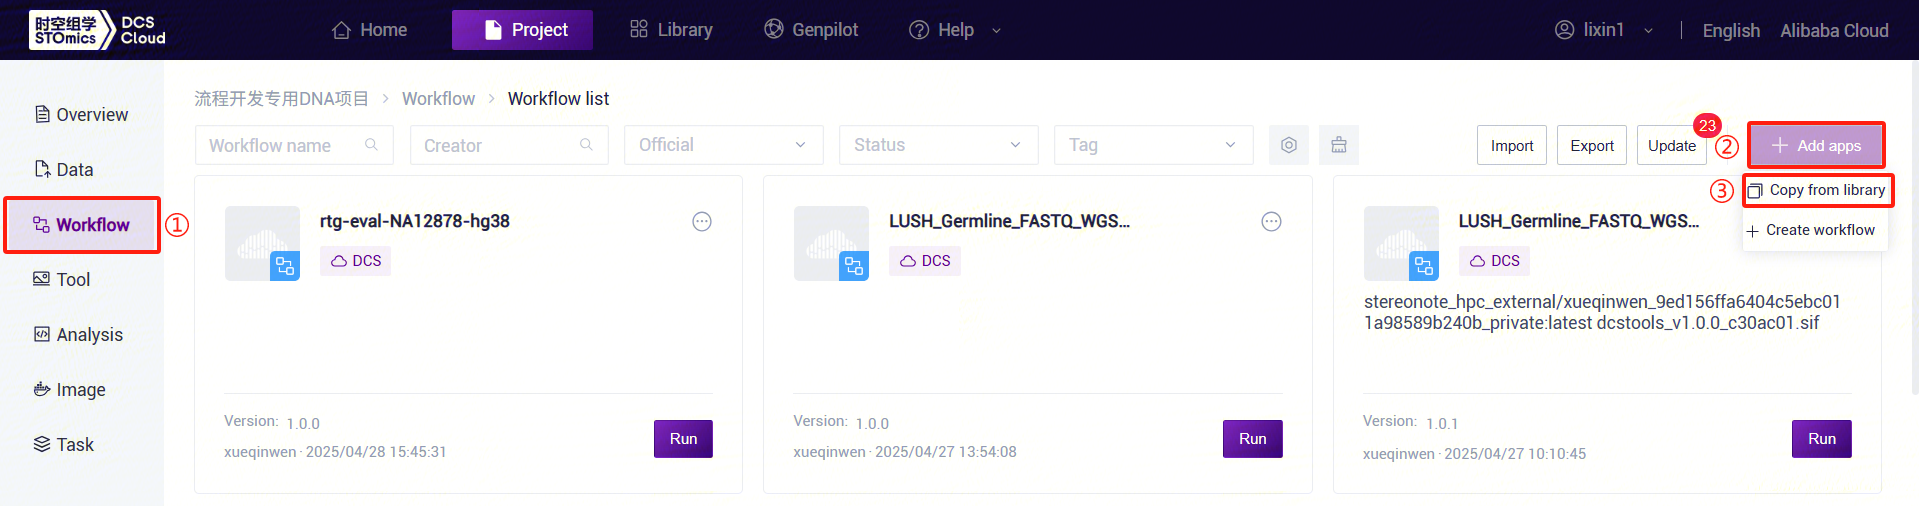
- Click the left navigation bar [Workflow] to enter the workflow analysis page. Click the upper-right corner [+ Add apps] to add a workflow, then click [Copy from library] (Figure 3-4):
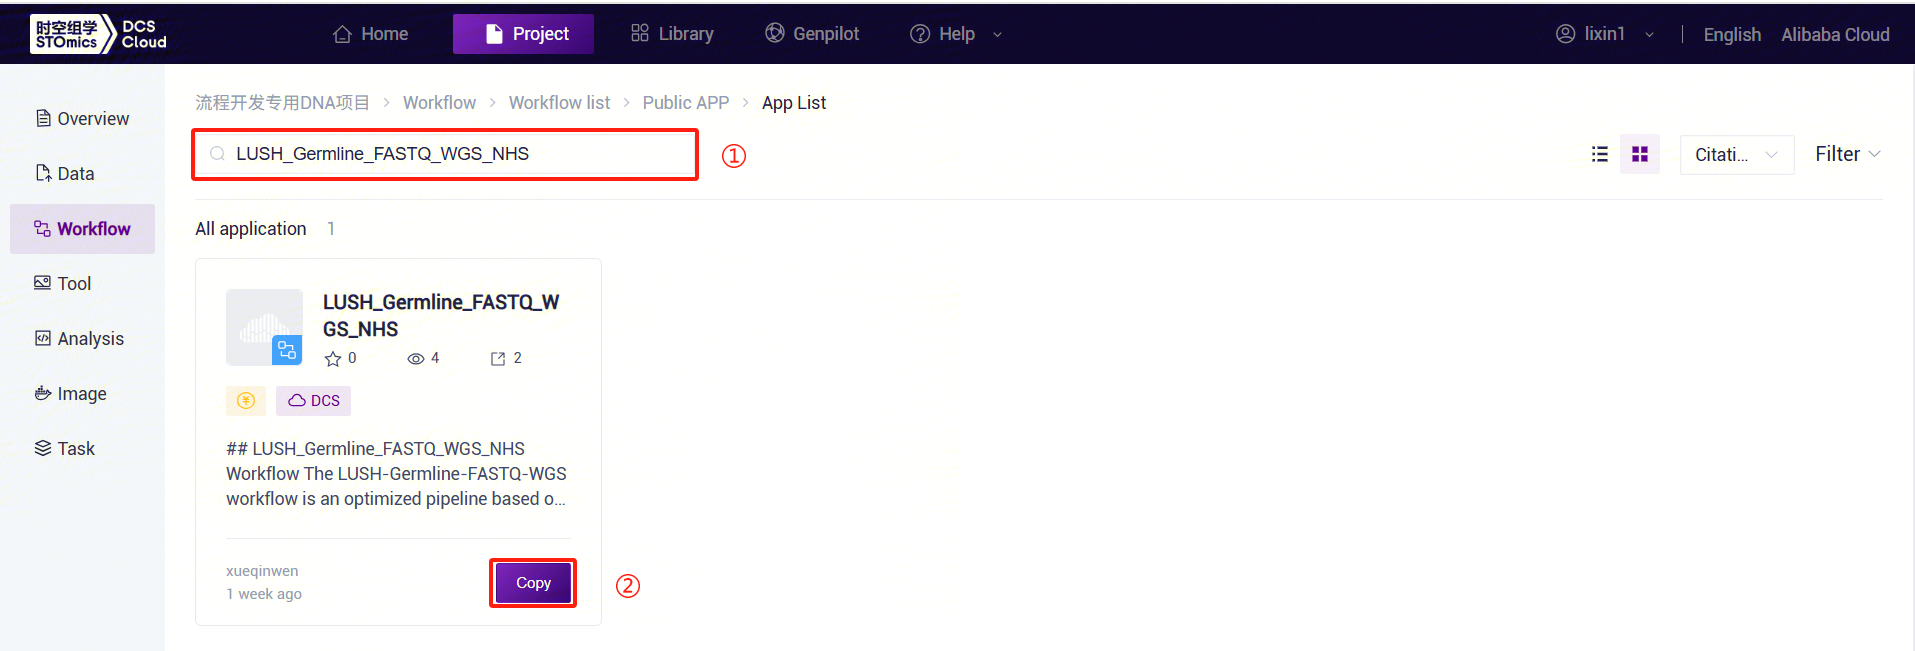
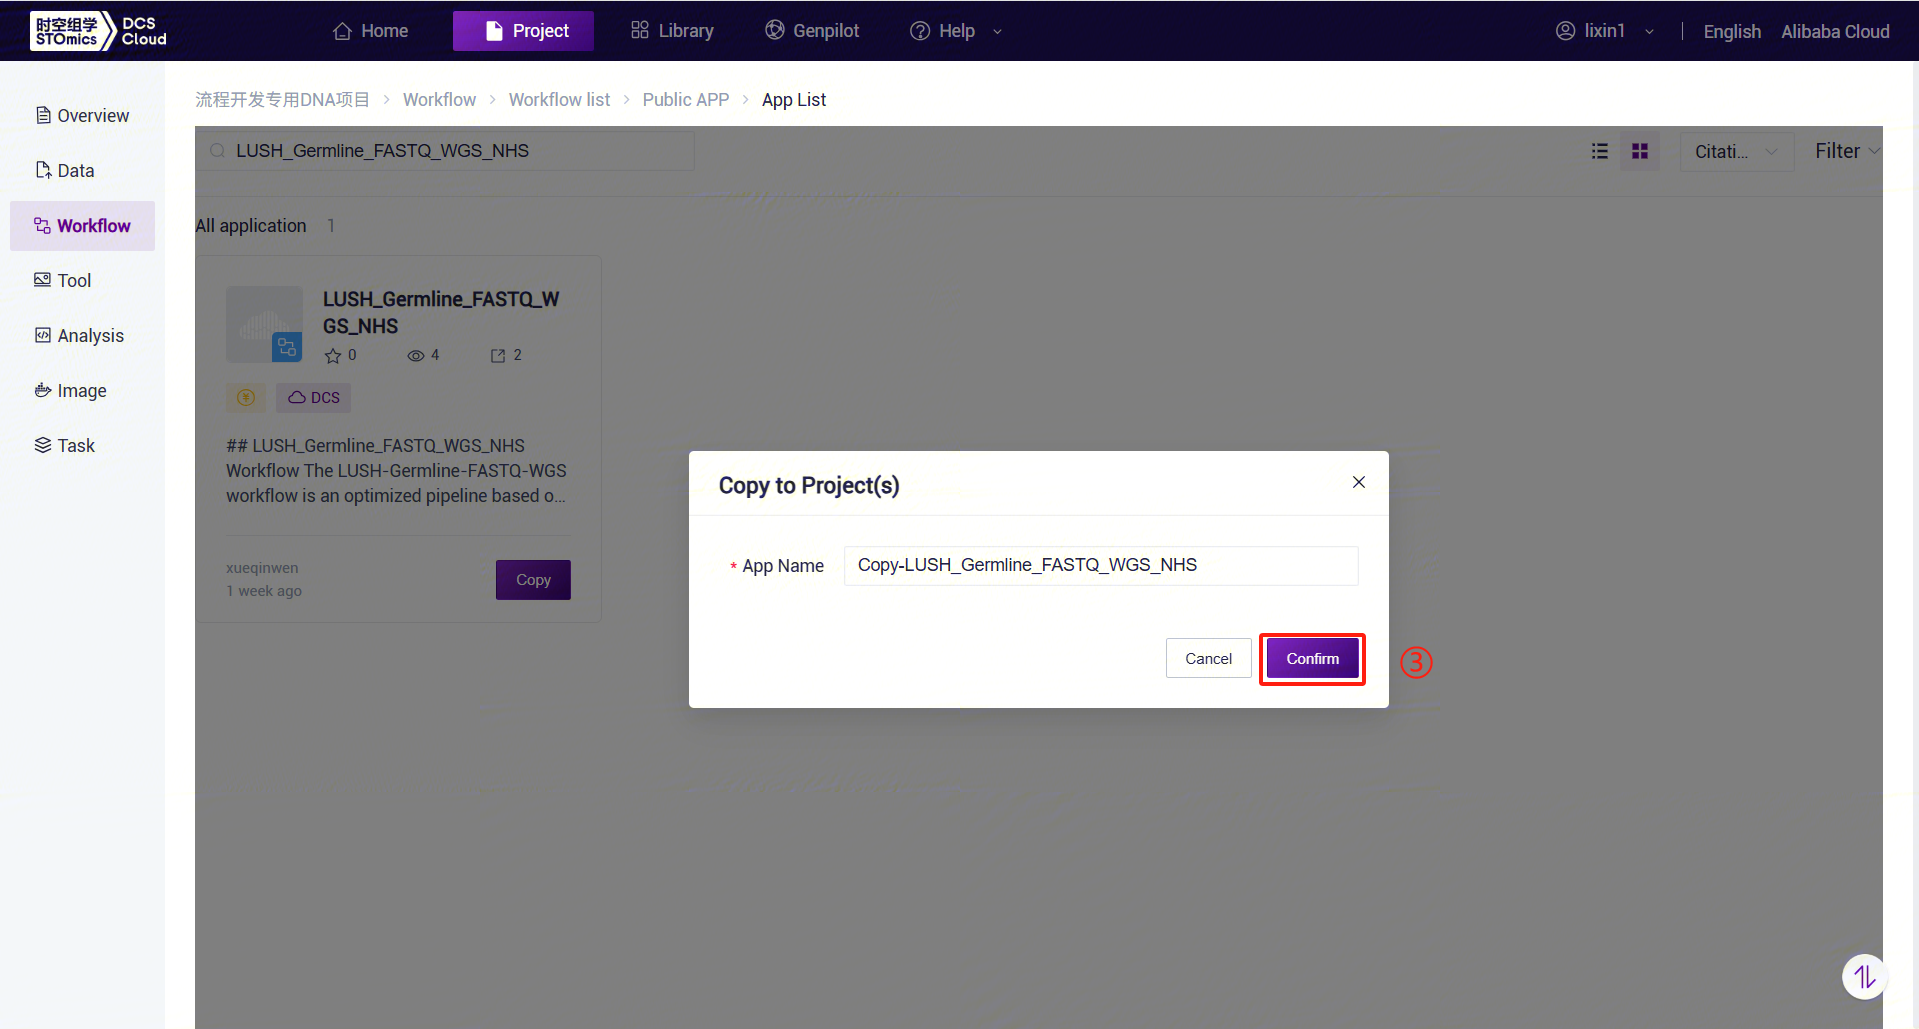
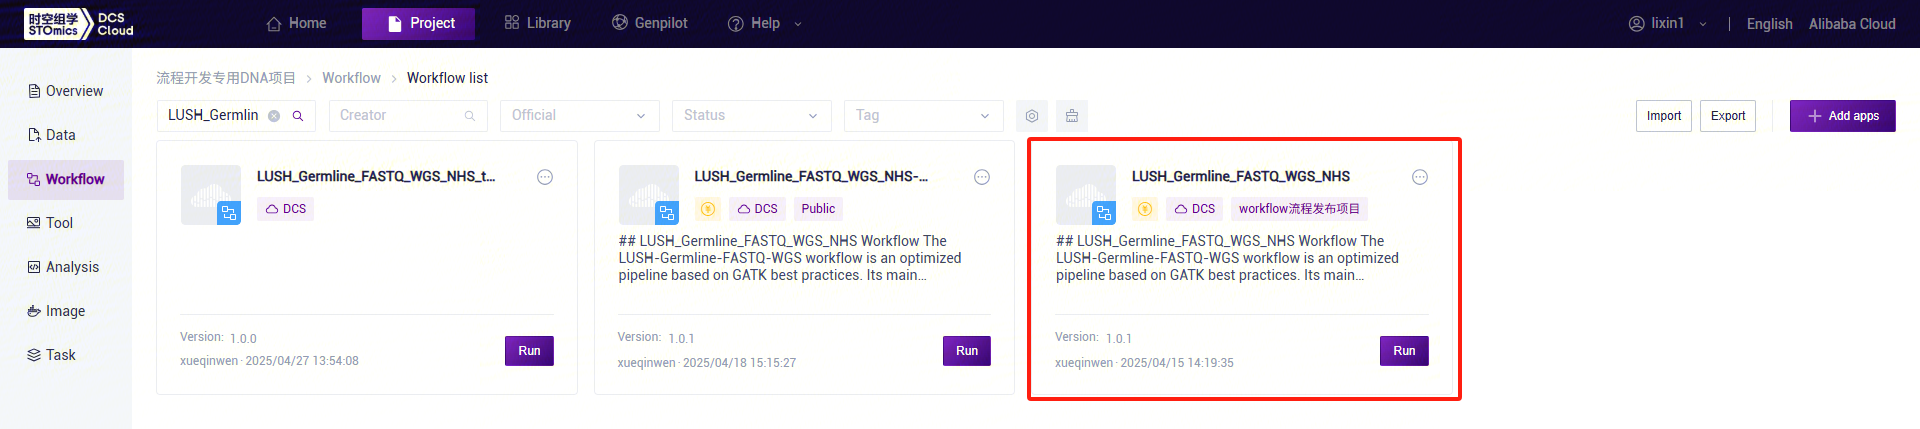
- For example, for LUSH_Germline_FASTQ_WGS_NHS, enter the workflow name LUSH_Germline_FASTQ_WGS_NHS in the search box, select it, click [Copy], then click [Confirm]. Perform the same operation for other workflow suites:
- The workflow is successfully added:
3.2.3 Step 3: LUSH Reference Genome Index Construction
- For other species genome analysis, the LUSH workflow supports users in providing and constructing reference genome indexes.
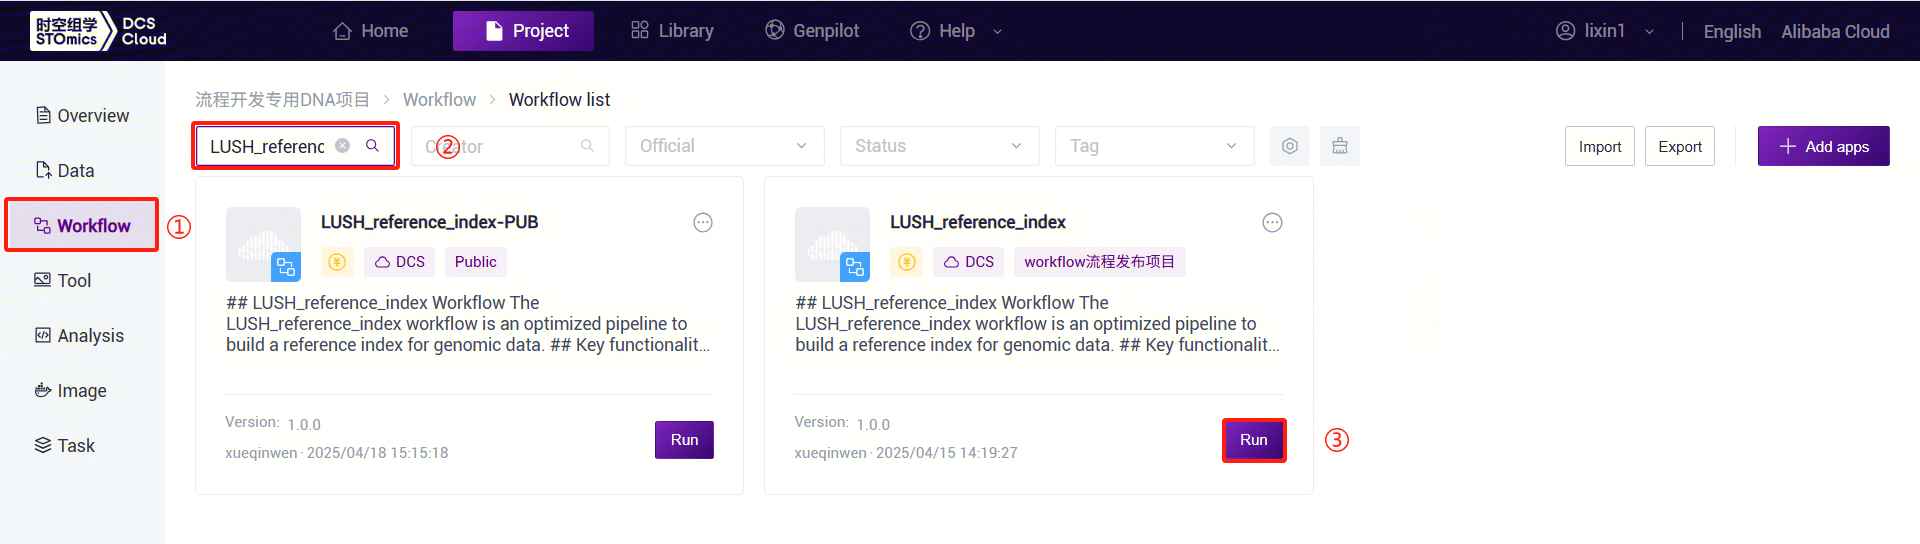
- Click the left navigation bar [Workflow] to enter the workflow analysis page. In the search box, enter LUSH_reference_index and click [Run]:
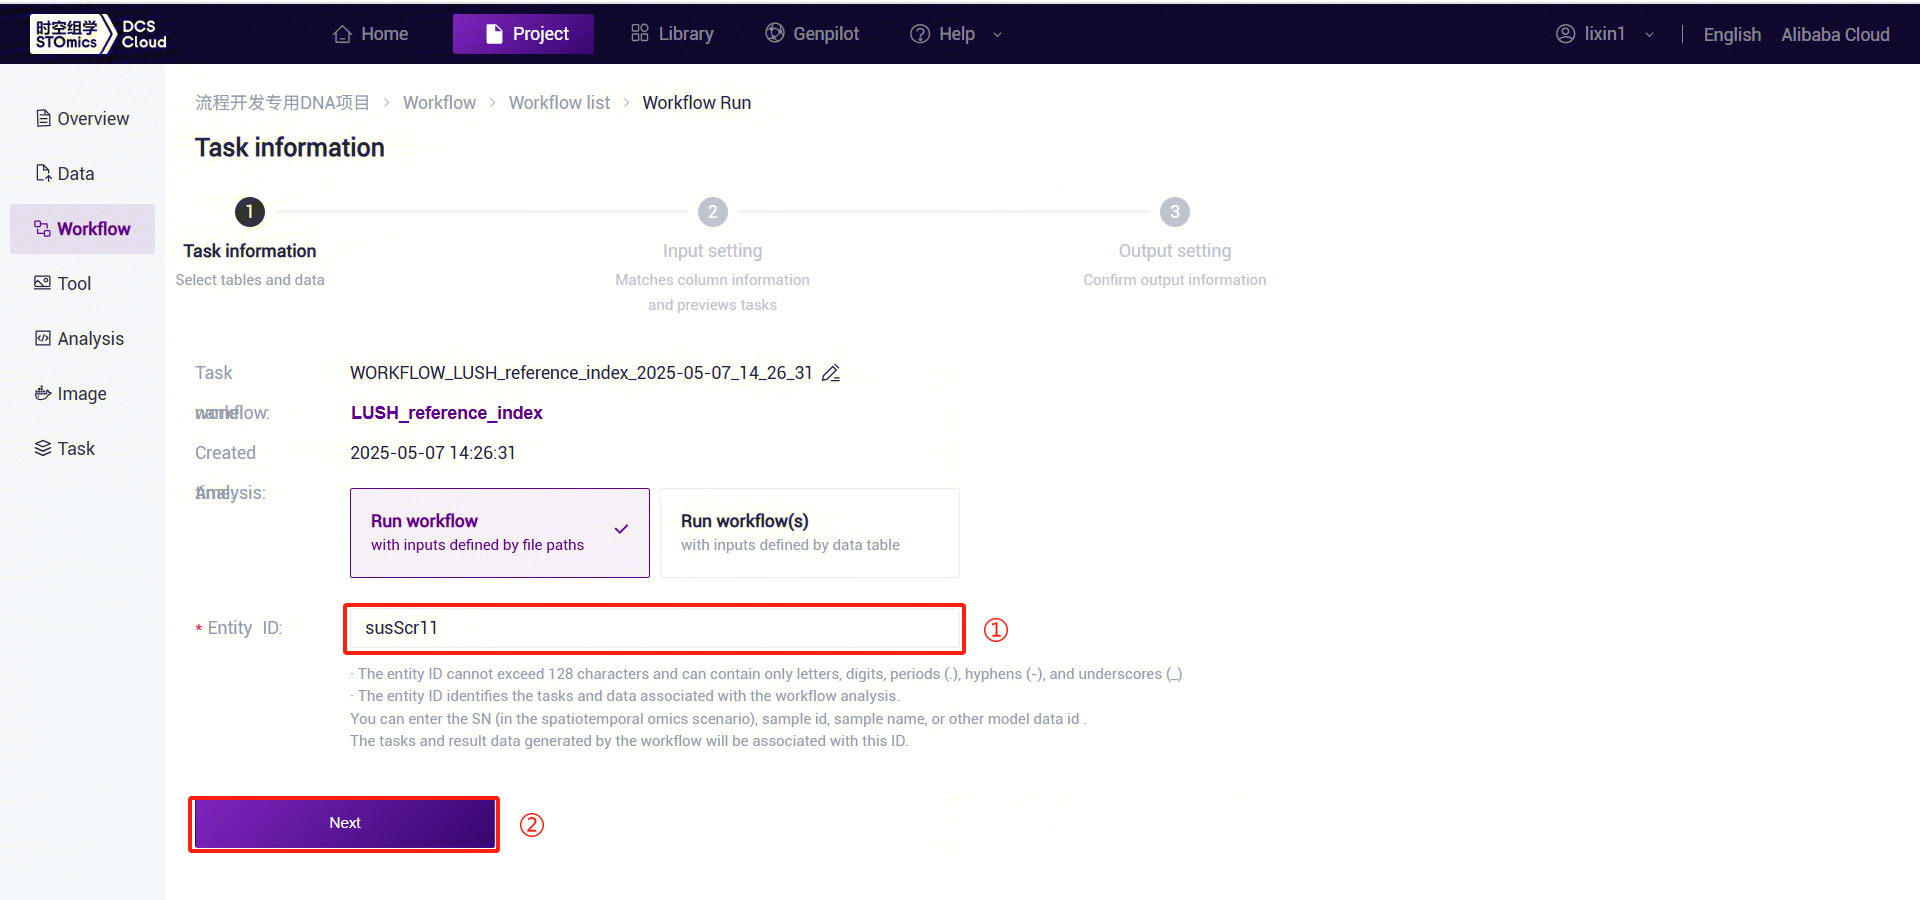
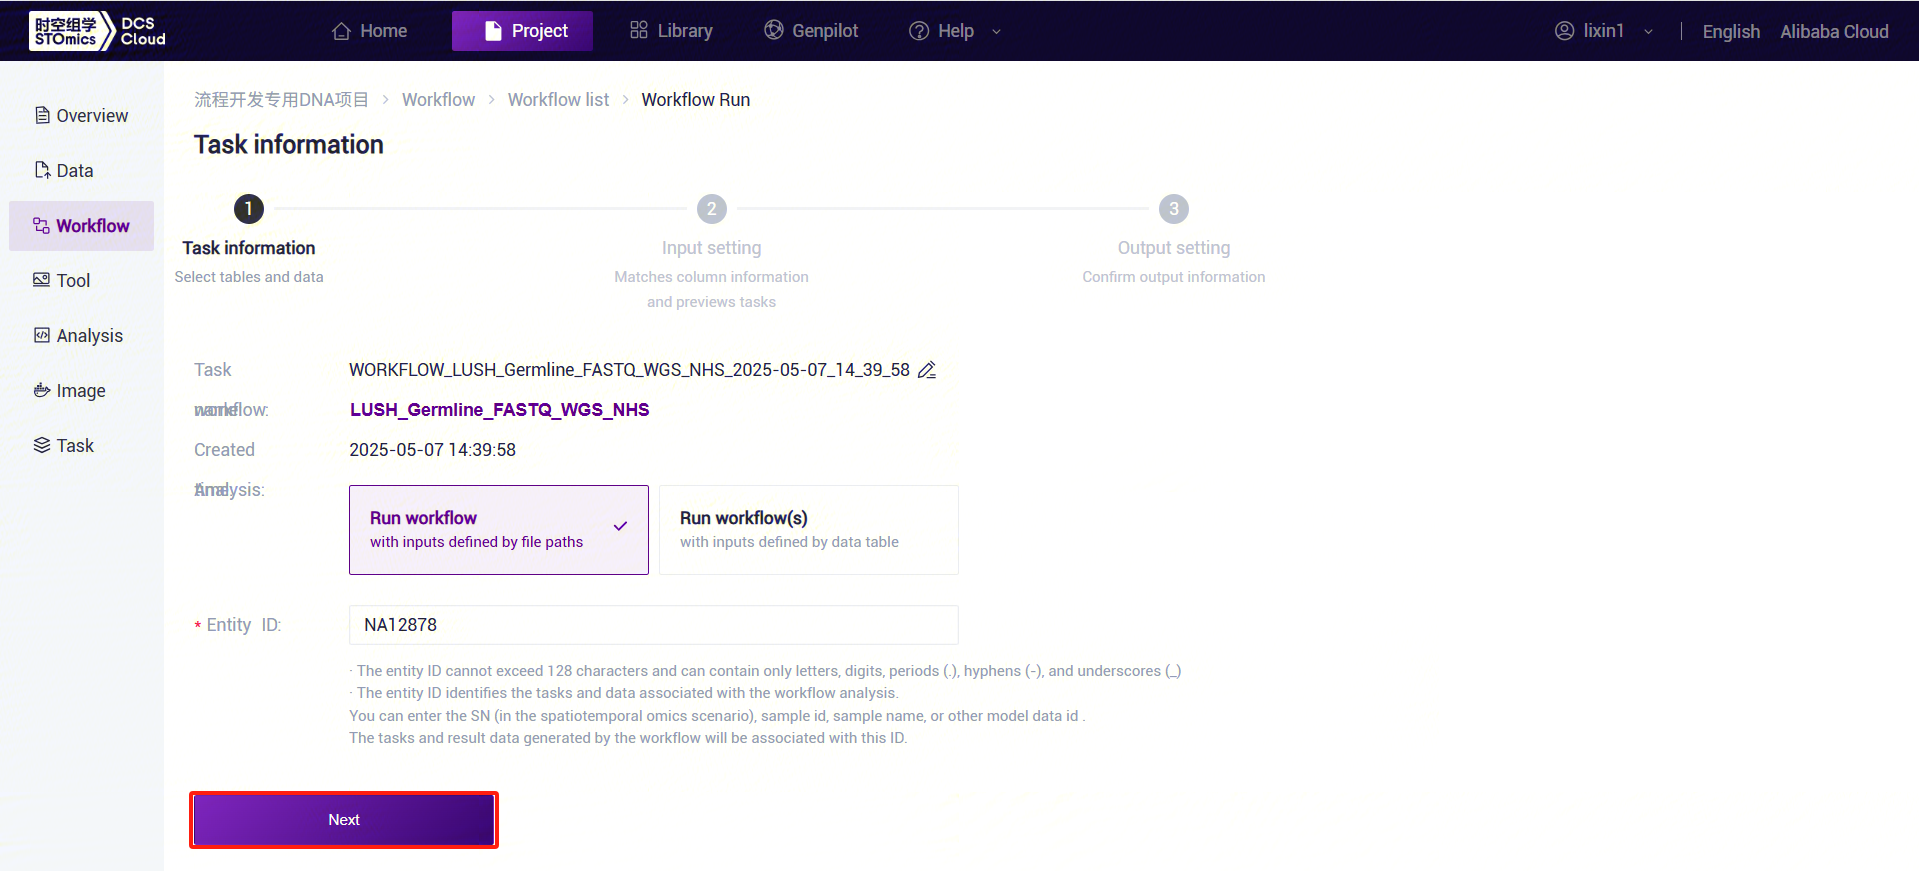
- Enter the entity ID and click [Next] (Figure 3-8):
- Enter parameter information for LUSH, then click [Next] (Figure 3-9):
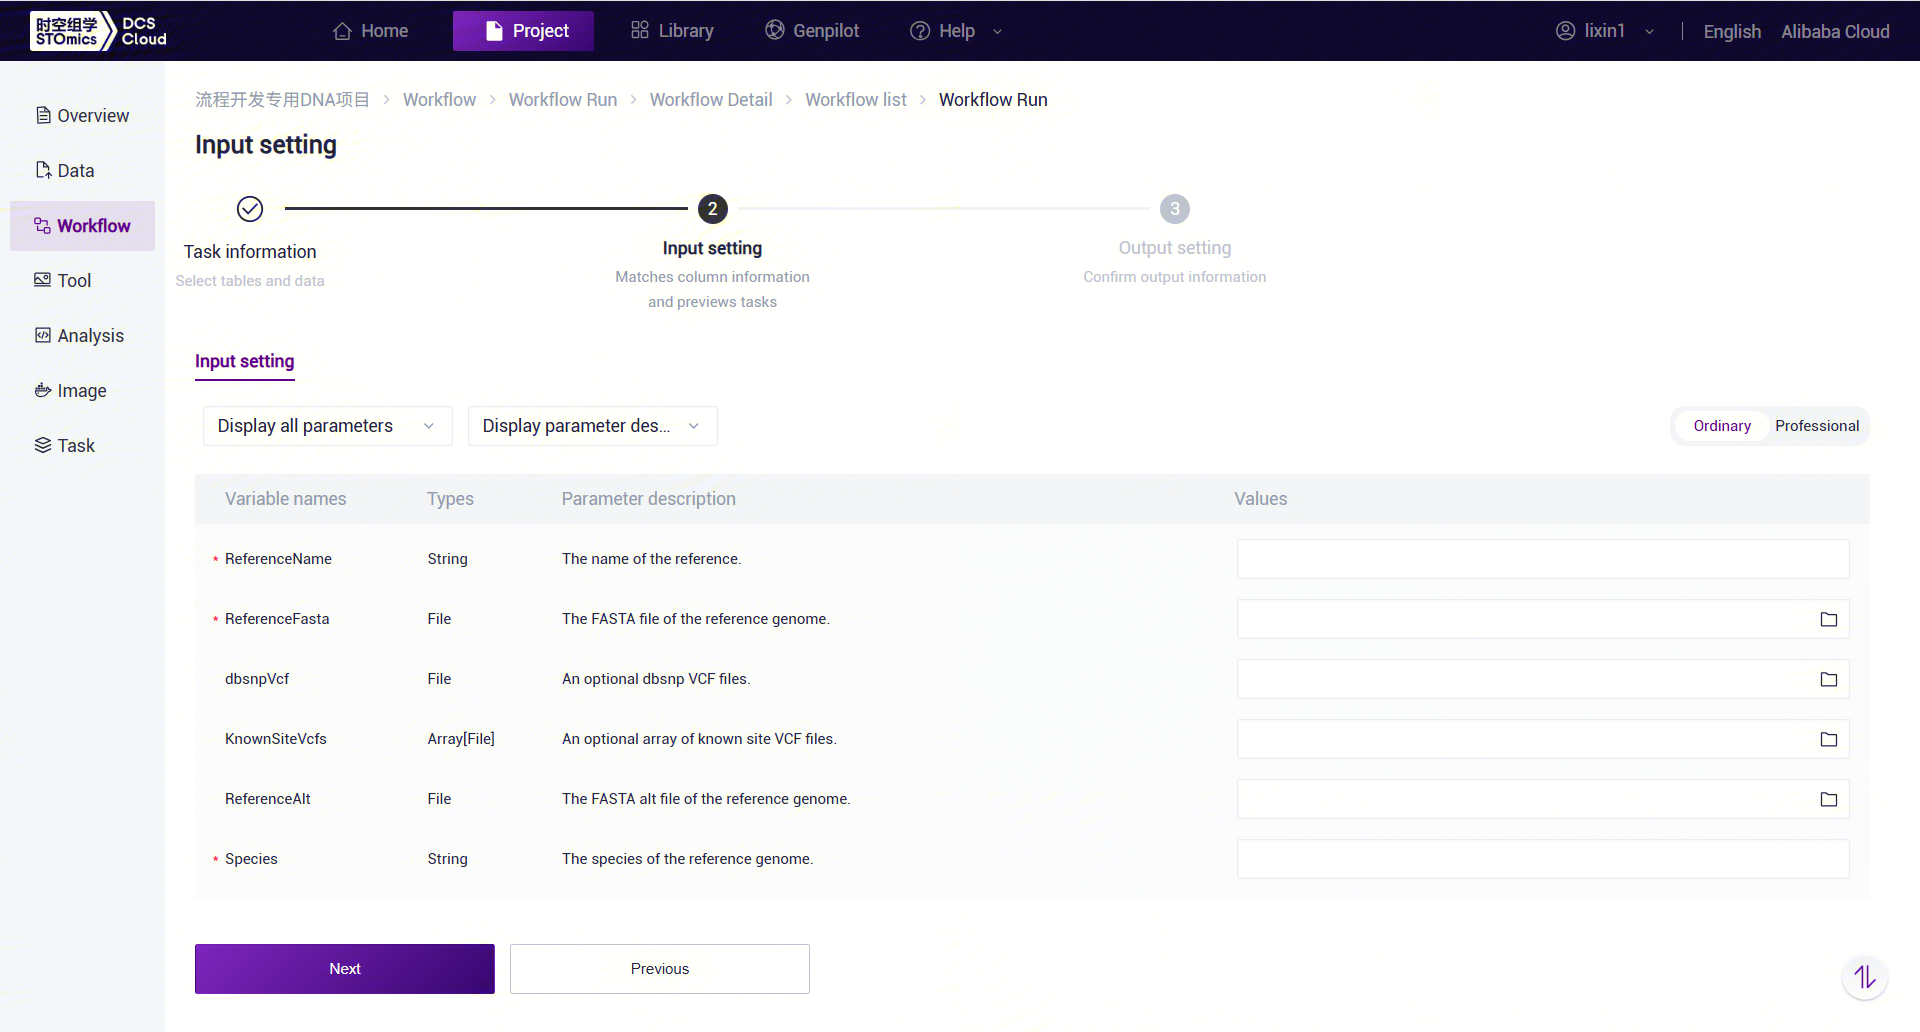
LUSH_build_index Workflow Variable Descriptions:
- ReferenceName: Reference genome name.
- ReferenceFasta: Reference genome FASTA file.
- dbsnpVcf: dbSNP database VCF file for the reference genome (optional).
- KnownSiteVcfs: VCF file containing known sites for the species (optional).
- ReferenceAlt: Index file containing alt information for the species (optional).
- Species: Species name.
- Click [Run] to start the analysis (Figure 3-10):

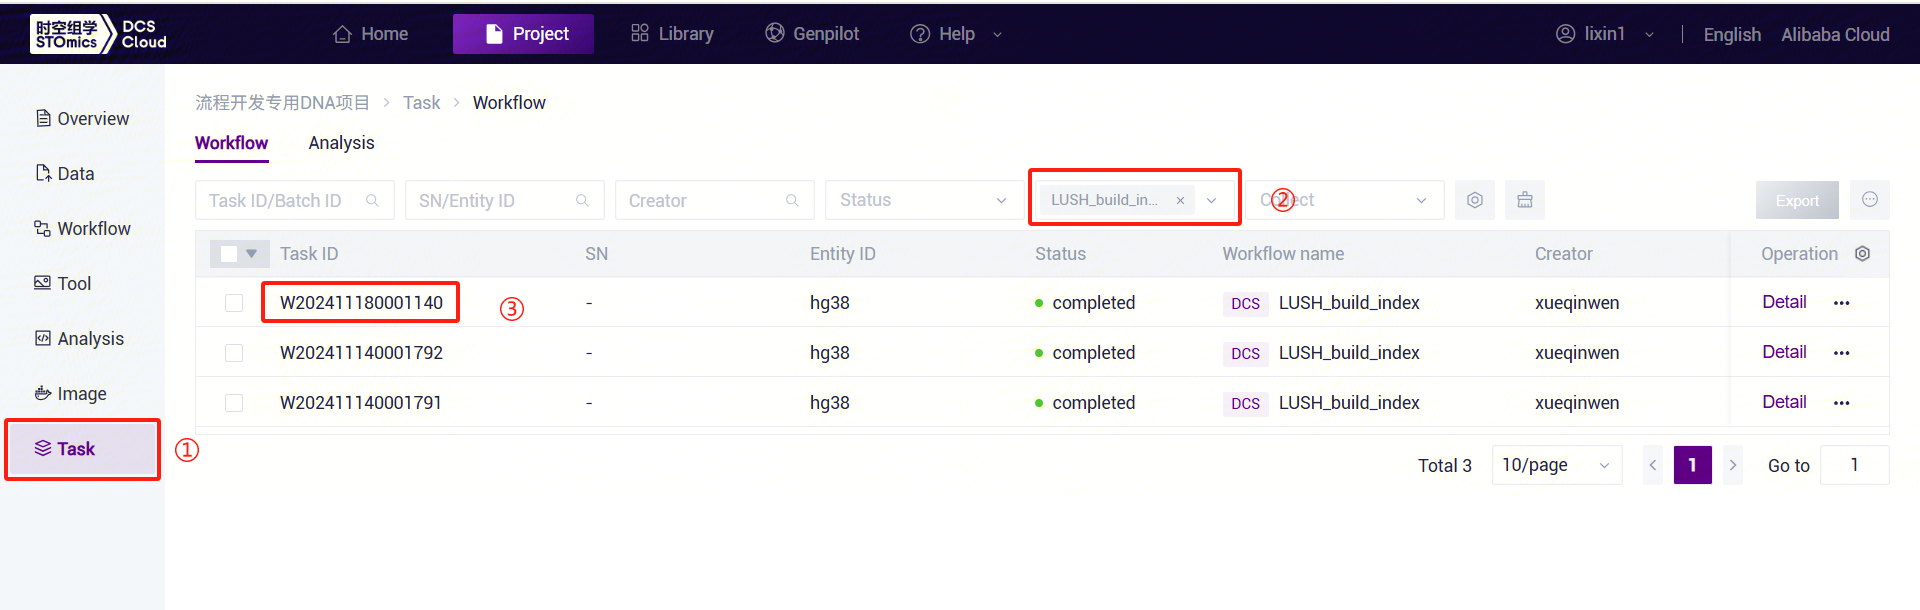
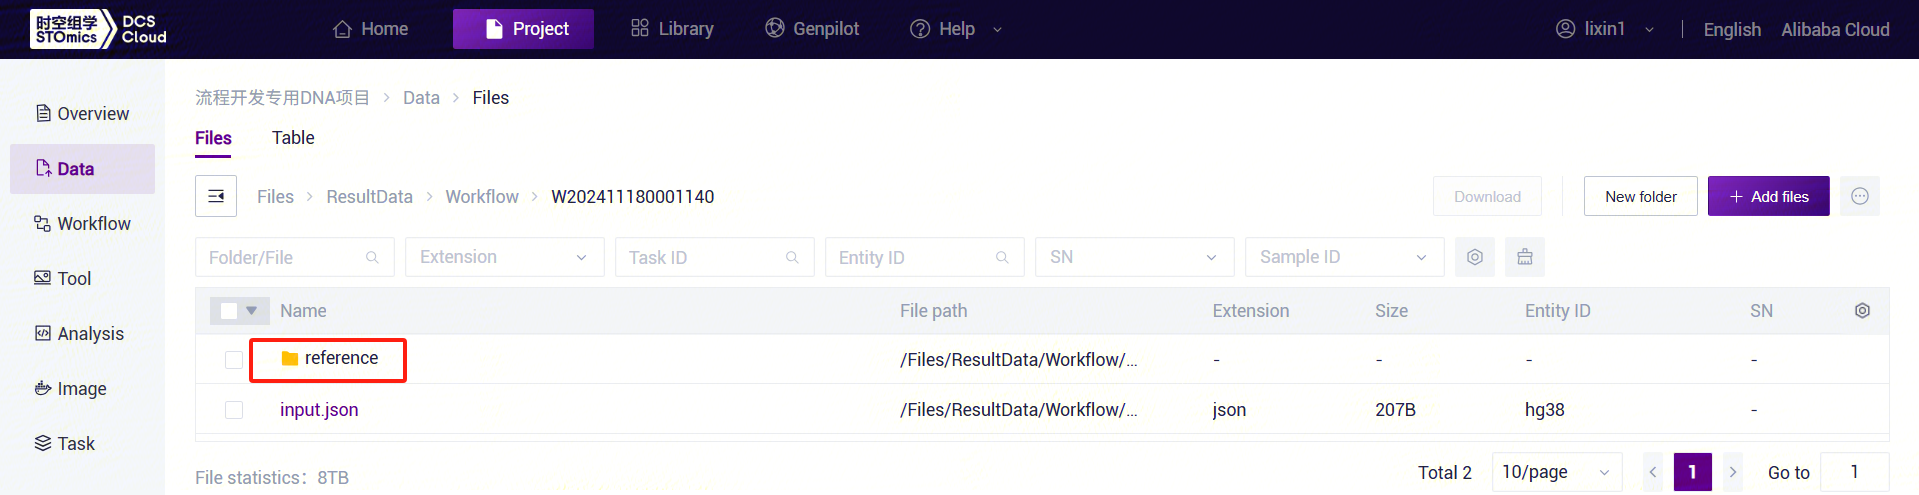
- Click the left navigation bar [Task] to enter the workflow analysis page. Under Workflow Name, select LUSH_build_index to view the task status. Once the task is completed, the status will display
 "completed." Copy the task number, click the navigation bar [Data], and enter the task number in the folder/file name search box. Navigate to the result files, where the reference folder will be used as the ReferenceDir parameter input for the LUSH_Germline_FASTQ_WGS_NHS workflow.
3.2.4 Step 4: LUSH_Germline_FASTQ_WGS_NHS Analysis Workflow
- Click the left navigation bar [Workflow] to enter the workflow analysis page. In the search box, enter LUSH_Germline_FASTQ_WGS_NHS and click [Run] (refer to 3.2.3).
- Enter the entity ID (usually the sample ID) and click [Next] (refer to 3.2.3):
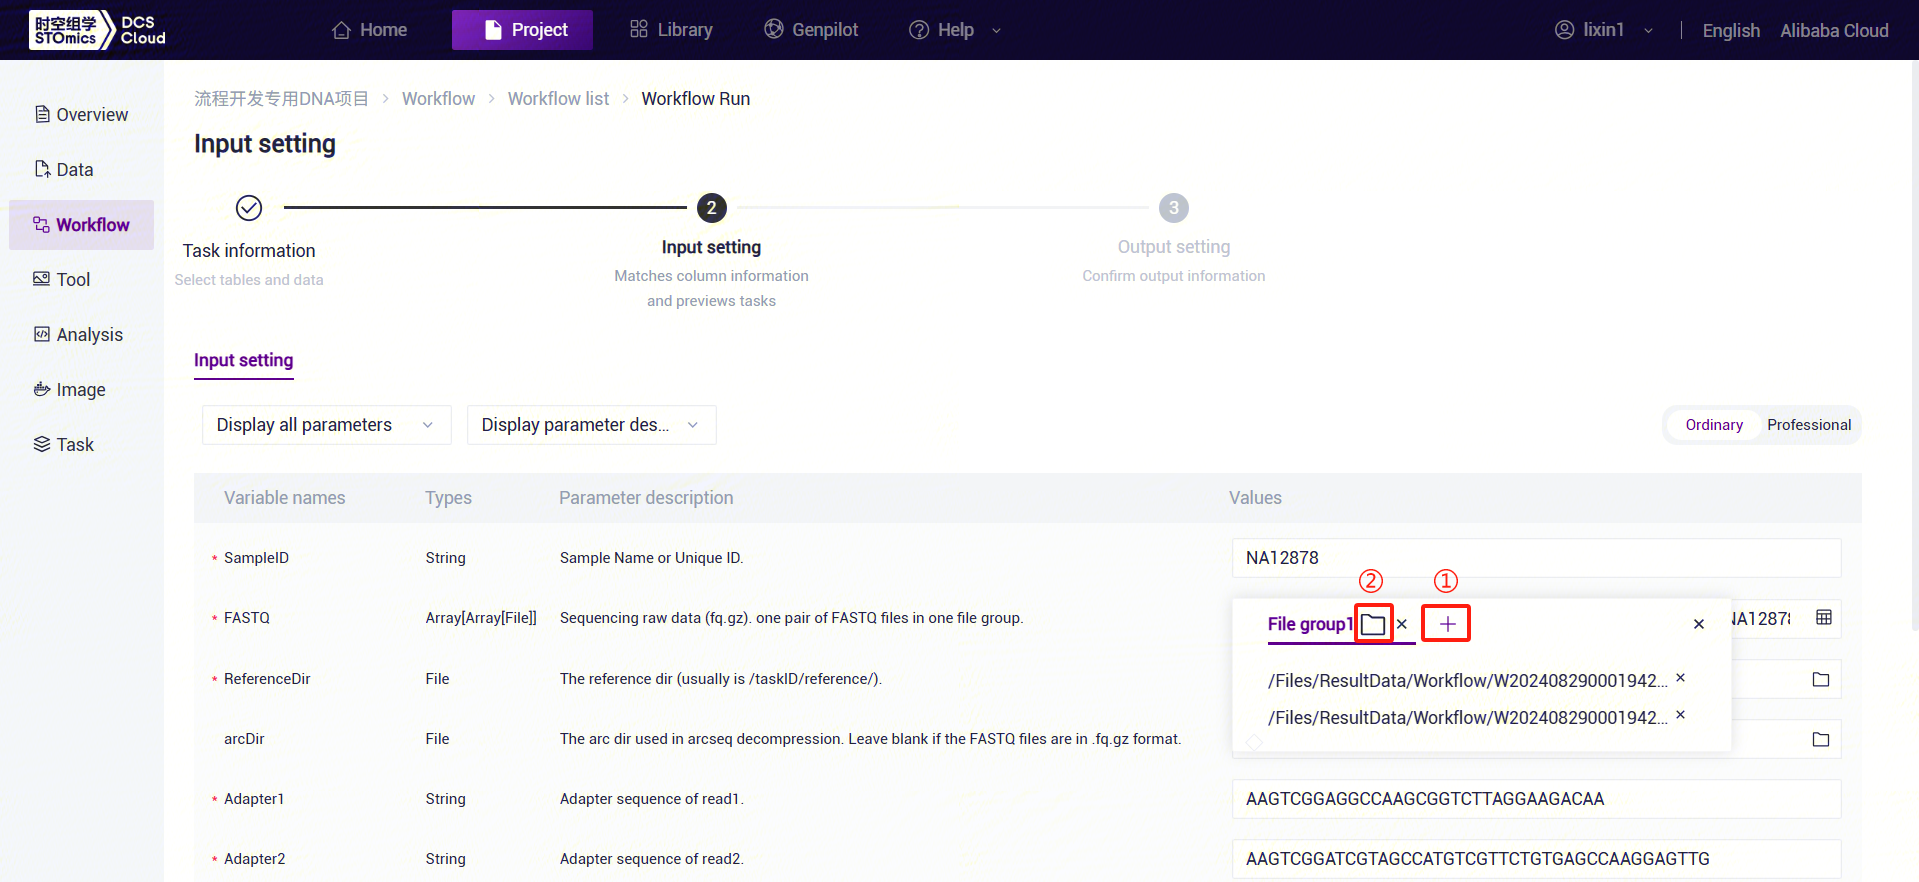
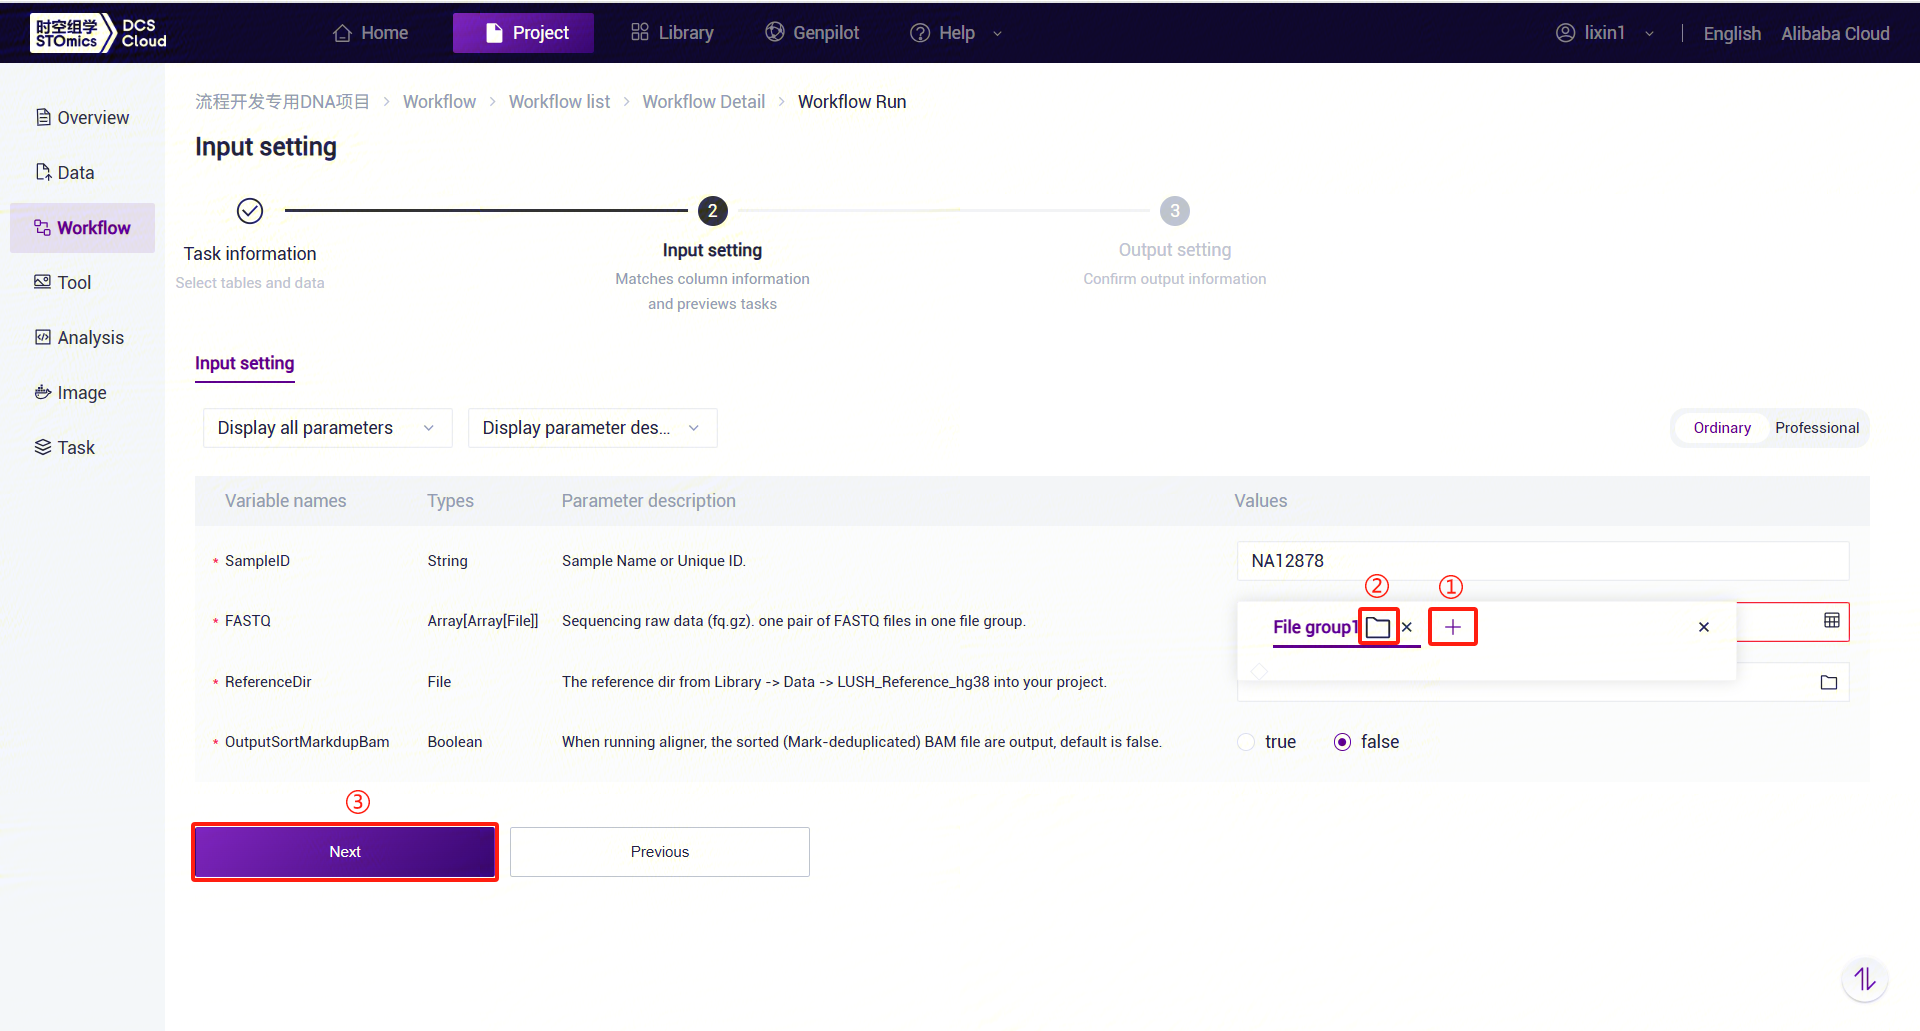
- Enter sample information for LUSH_Germline_FASTQ_WGS_NHS:
- PE FASTQ Input: Based on the number of paired FASTQ files, click the "+" button to add file groups and select the corresponding FASTQ1 and FASTQ2 files for each group.
- SE FASTQ Input: Similar to PE data, place one FASTQ file in each file group.
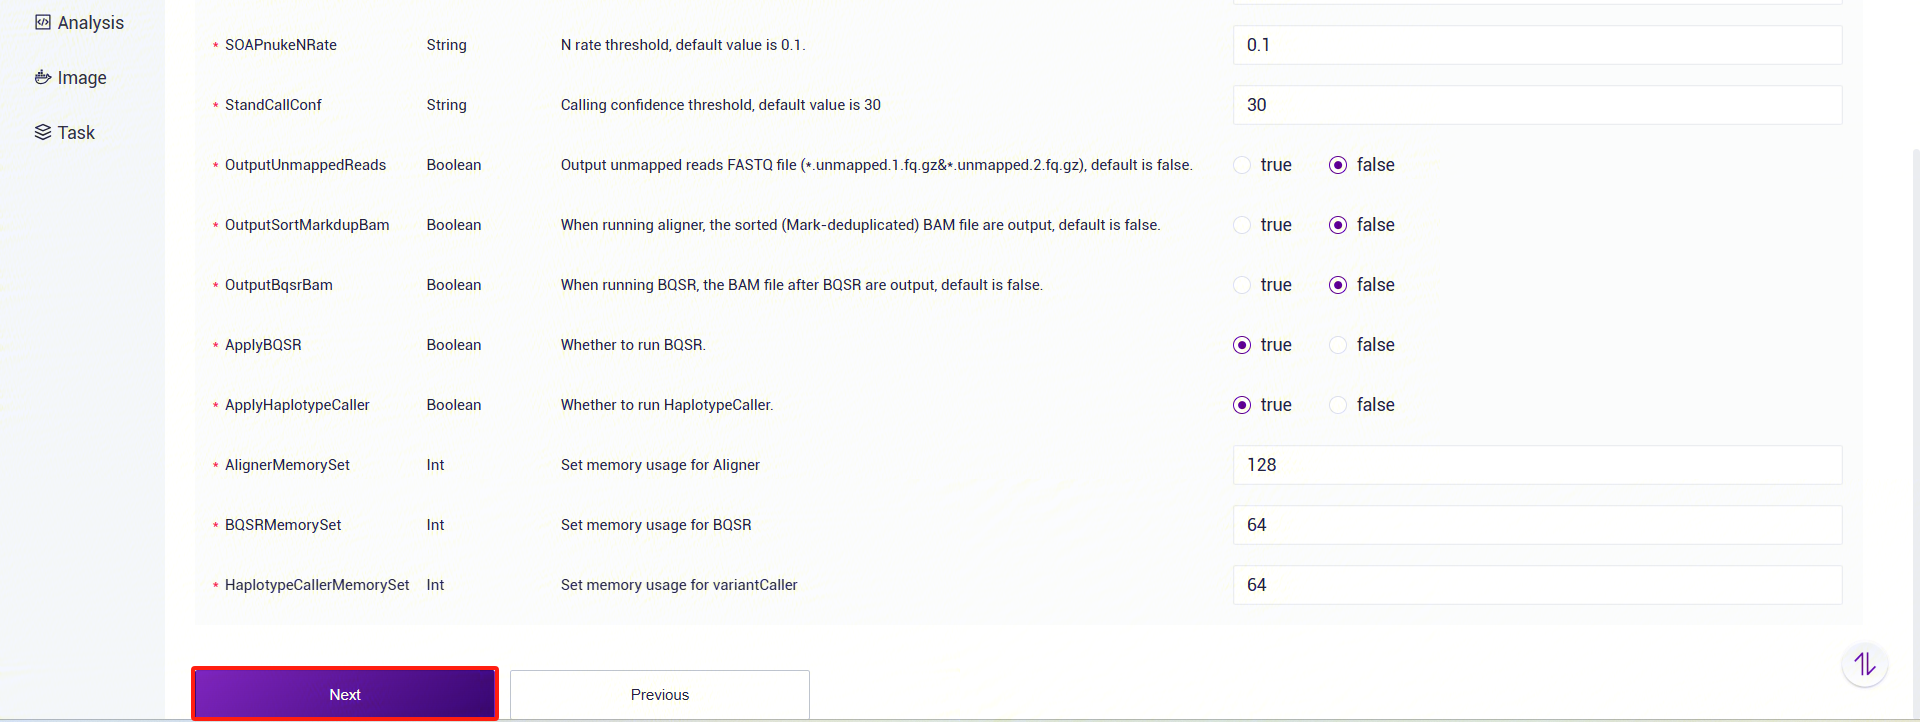
LUSH_Germline_FASTQ_WGS_NHS Parameter Descriptions:
- SampleID: Sample name or unique ID, defaulting to the Entity ID.
- FASTQ: Sequencing data (fq.gz or arc). PE: One file group contains a pair of FASTQ files. SE: One file group contains one FASTQ file.
- ReferenceDir: Supports user-uploaded genome data for constructing a reference genome (refer to 3.2.3). Input is the reference directory from the LUSH_reference_index workflow result files.
- arcDir: Folder containing FASTQ index files for arcseq decompression. Not required if FASTQ format is fq.gz.
- Adapter1: Adapter sequence for Read1 (used for filtering).
- Adapter2: Adapter sequence for Read2 (used for filtering).
- SOAPnukeLowQual: SOAPnuke low-quality threshold, default is 12.
- SOAPnukeLowQualityRate: SOAPnuke low-quality rate threshold, default is 0.5.
- SOAPnukeNRate: SOAPnuke N ratio threshold, default is 0.1.
- StandCallConf: Variant detection confidence threshold, default is 30.
- OutputUnmappedReads: Whether to output unmapped reads (FASTQ files), default is no.
- OutputSortMarkdupBam: Whether to output sorted and deduplicated BAM files, default is no.
- OutputBqsrBam: Whether to output BQSR-processed BAM files, default is no.
- ApplyBQSR: Whether to run BQSR, default is yes. If set to "no," the sorted and deduplicated BAM file will be used for variant detection. If the reference genome's knownsites VCF is empty, this will be forced to "no."
- ApplyHaplotypeCaller: Whether to run HaplotypeCaller, default is yes.
- AlignerMemorySet: Alignment memory setting, default is 128 (GB).
- BQSRMemorySet: BQSR memory setting, default is 64 (GB).
- HaplotypeCallerMemorySet: HaplotypeCaller memory setting, default is 64 (GB).
- Click [Run] to start the analysis and wait for the results (Figure 3-15):

3.3 Use Case 2: LUSH Fixed-Price Workflow - Manual Submission
3.3.1 Step 1: Upload Data
Same as Use Case 1 (Manual Submission) Step 1 (refer to 3.2.1 Step 1: Upload Data).
3.3.2 Step 2: Add Workflow
Same as Use Case 1 (Manual Submission) Step 2 (refer to 3.2.2 Step 2: Add Workflow).
3.3.3 Step 3: Add Public hg38 Reference Genome Files
- Click the "Public Library" tab at the top of the page to enter the public library interface.

- On the public library page, click the Data tab to enter the data tab. In the search bar, enter "LUSH_Reference_hg38" to search. In the search results, find the LUSH_Reference_hg38 card and click the Copy button.
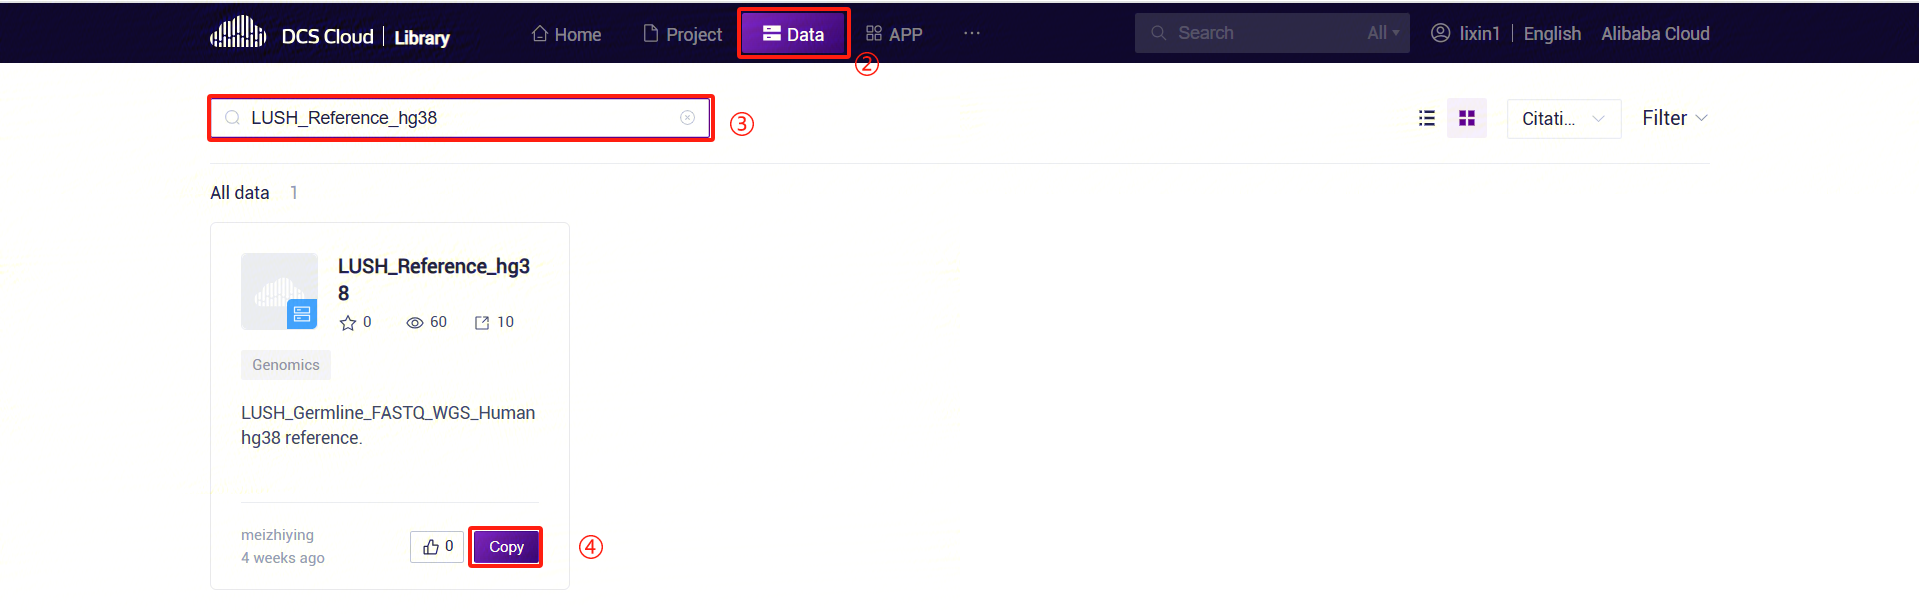
- In the pop-up dialog, select the project where you want to store the data. Navigate to the specified path in the project, set the specific location for data storage, and complete the public data pull.

3.3.4 Step 4: LUSH_Germline_FASTQ_WGS_Human Analysis Workflow
- Click the left navigation bar [Workflow] to enter the workflow analysis page. In the search box, enter LUSH_Germline_FASTQ_WGS_Human and click [Run] (refer to 3.2.3).
- Enter the entity ID (usually the sample ID) and click [Next] (refer to 3.2.3).
- Enter sample information for LUSH_Germline_FASTQ_WGS_Human:
PE FASTQ Input: Based on the number of paired FASTQ files, click the "+" button to add file groups and select the corresponding FASTQ1 and FASTQ2 files for each group.
SE FASTQ Input: Similar to PE data, place one FASTQ file in each file group.
LUSH_Germline_FASTQ_WGS_Human Parameter Descriptions:
- SampleID: Sample name or unique ID, defaulting to the Entity ID.
- FASTQ: Sequencing data (fq.gz or arc). PE: One file group contains a pair of FASTQ files. SE: One file group contains one FASTQ file.
- ReferenceDir: Reference genome folder, which needs to be pulled from the public library into the analysis project.
- OutputSortMarkdupBam: Whether to output sorted and deduplicated BAM files, default is no.
- Click [Run] to start the analysis and wait for the results (Figure 3-20):

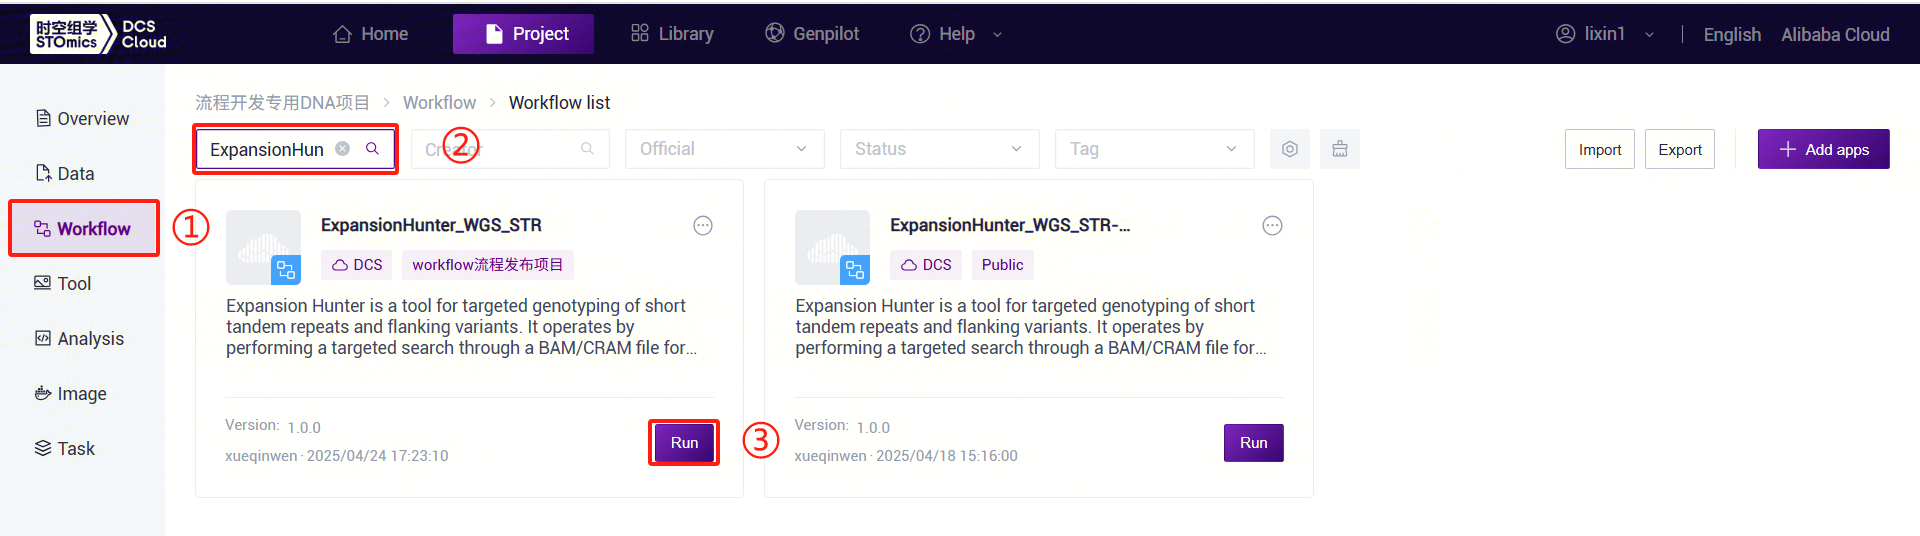
3.4 Use Case 3: ExpansionHunter_WGS_STR Workflow - Manual Submission
The ExpansionHunter_WGS_STR workflow uses Expansion Hunter to identify short tandem repeat (STR) sequences. Expansion Hunter is a tool for targeted genotyping of short tandem repeats and flanking variants. It searches BAM/CRAM files for reads spanning, flanking, or fully contained within each repeat. This analysis workflow currently only supports alignment data based on the human genome hg38 reference sequence.
3.4.1 Step 1: Input Data
For LUSH_Germline_FASTQ_WGS_Human analysis, set the OutputSortMarkdupBam parameter to "true" to output the aligner BAM file in the workflow results.
3.4.2 Step 2: Add Workflow
Similar to Use Case 1 (Manual Submission) Step 2, search by workflow name (refer to 3.2.2 Step 2: Add Workflow).
3.4.3 Step 3: ExpansionHunter_WGS_STR Analysis Workflow
- Click the left navigation bar [Workflow] to enter the workflow analysis page. In the search box, enter ExpansionHunter_WGS_STR and click [Run] (refer to 3.2.3):
- Enter the entity ID (usually the sample ID) and click [Next] (refer to 3.2.3):
")
- Enter sample information for ExpansionHunter_WGS_STR (Figure 3-23).
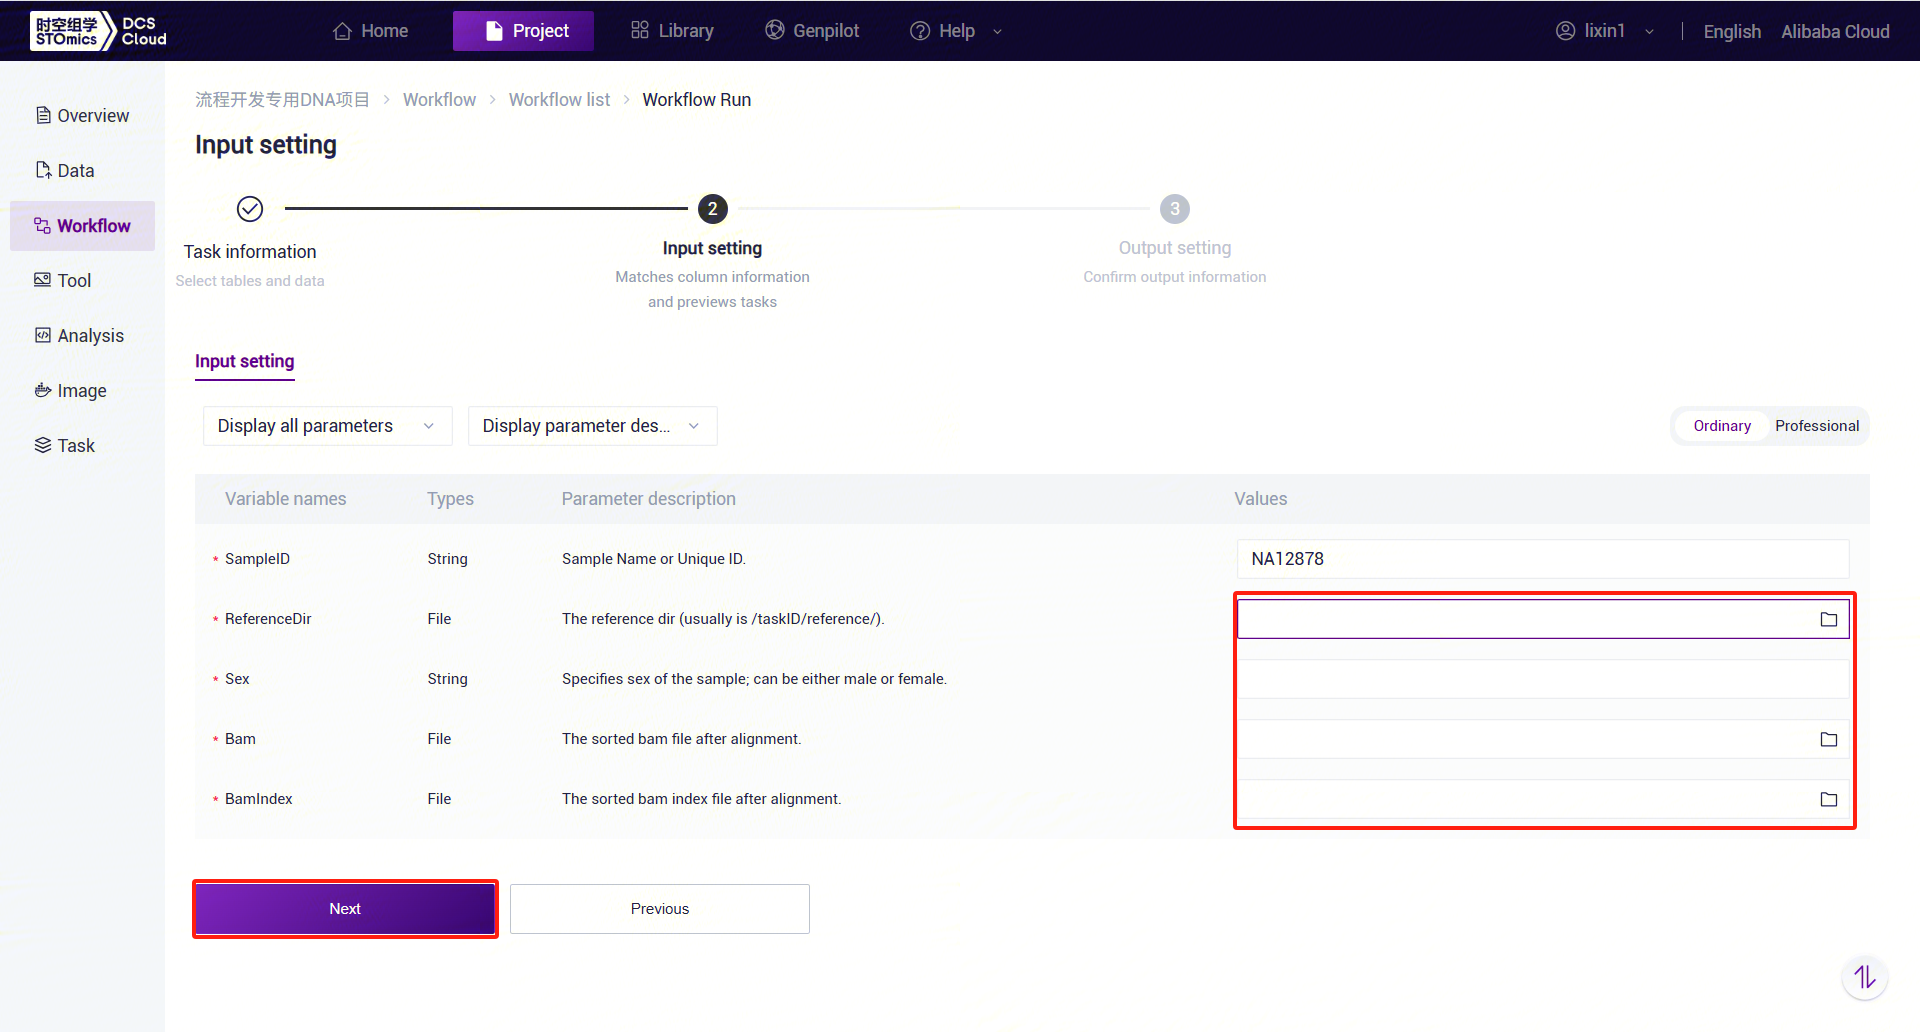
ExpansionHunter_WGS_STR Parameter Descriptions:
- SampleID: Sample name or unique ID, defaulting to the Entity ID.
- ReferenceDir: Reference genome folder, which needs to be pulled from the public library into the analysis project.
- Sex: Sample gender, "male" or "female."
- Bam: Sorted and deduplicated BAM file.
- BamIndex: Index file for the sorted and deduplicated BAM file.
- Click [Run] to start the analysis and wait for the results:

3.5 Use Case 4: PanGenie_WGS_SV Workflow - Manual Submission
The PanGenie_WGS_SV workflow is a graph-based pan-genome workflow designed for genotype imputation and structural variant (SV) detection using PanGenie from sequencing data. Genotype calculation is based on read k-mer counts and a set of known, fully assembled haplotypes. Compared to alignment-based methods, PanGenie achieves higher genotype concordance for almost all tested variant types and coverages. Improvements are particularly significant for large insertions (≥50 bp) and variants in repetitive regions, enabling these categories of variants to be included in genome-wide association studies.
3.5.1 Step 1: Upload Data
Same as Use Case 1 (Manual Submission) Step 1 (refer to 3.2.1 Step 1: Upload Data).
3.5.2 Step 2: Add Workflow
Similar to Use Case 1 (Manual Submission) Step 2, search by workflow name (refer to 3.2.2 Step 2: Add Workflow).
3.5.3 Step 3: Add PanGenie Reference Genome Files
- Click the "Public Library" tab at the top of the page to enter the public library interface.

- On the public library page, click the Data tab to enter the data tab. In the search bar, enter "PanGenie_refindex" to search. In the search results, find the PanGenie_refindex card and click the Copy button.
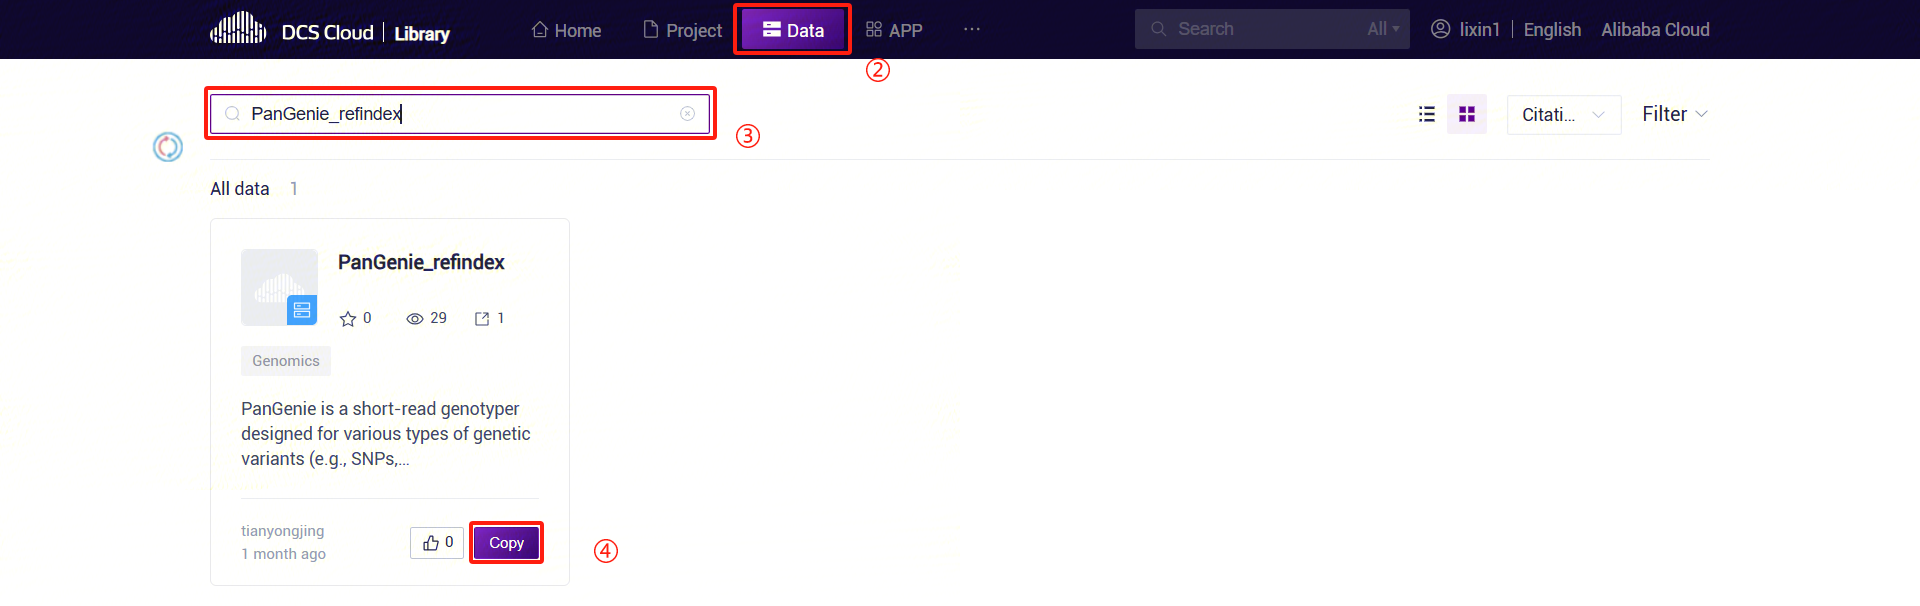
- In the pop-up dialog, select the project where you want to store the data. Navigate to the specified path in the project, set the specific location for data storage, and complete the public data pull.

3.5.4 Step 4: Add Human Structural Variant Annotation Database Files
Follow the method in Step 3, but change the search target to AnnotSV_annotations.
3.5.5 Step 5: PanGenie_WGS_SV Analysis Workflow
Click the left navigation bar [Workflow] to enter the workflow analysis page. Enter
PanGenie_WGS_SVin the search box and click [Run] (refer to 3.2.3):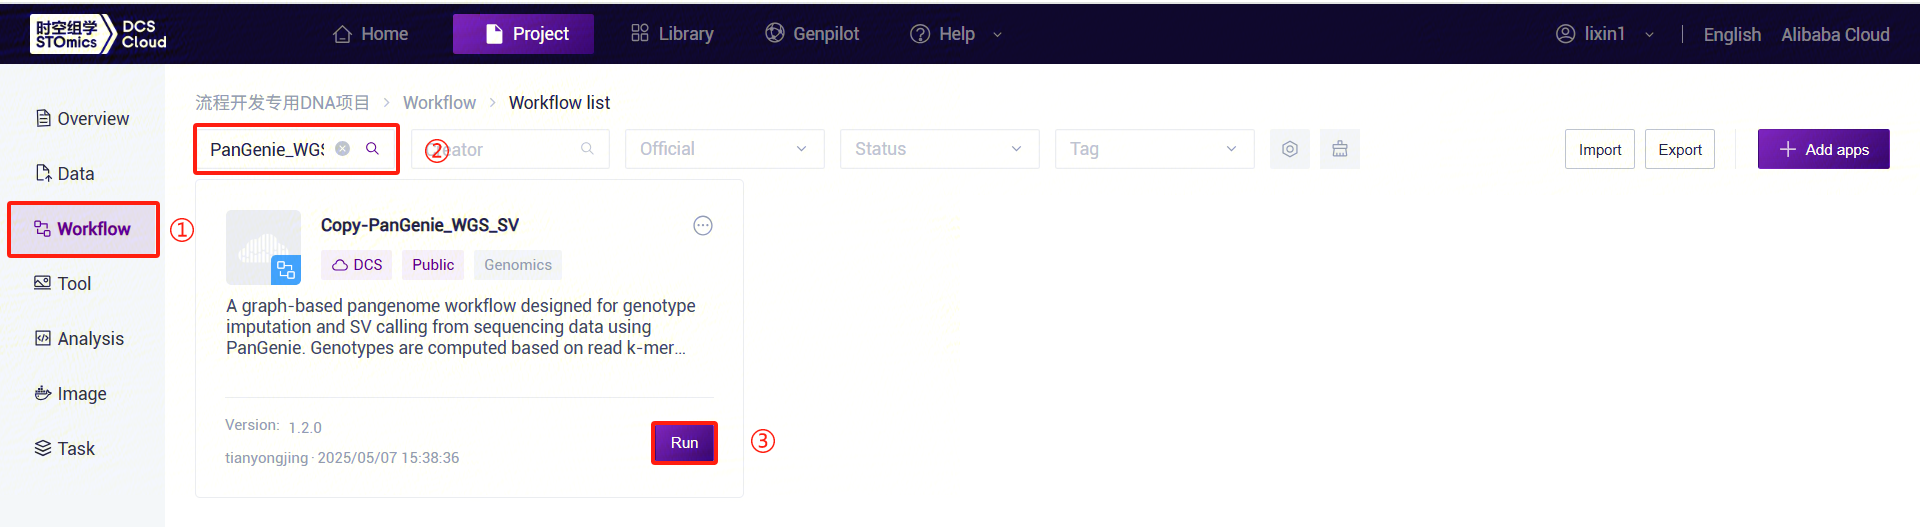
Figure 3-28 PanGenie_WGS_SV Analysis Step 5 (1) Enter the entity ID (usually the sample ID) and click [Next] (refer to 3.2.3):

Figure 3-29 PanGenie_WGS_SV Analysis Step 5 (2) PanGenie_WGS_SV: Enter sample information. Click the folder icon under FqFile to enter the data management page and select the FASTQ file.
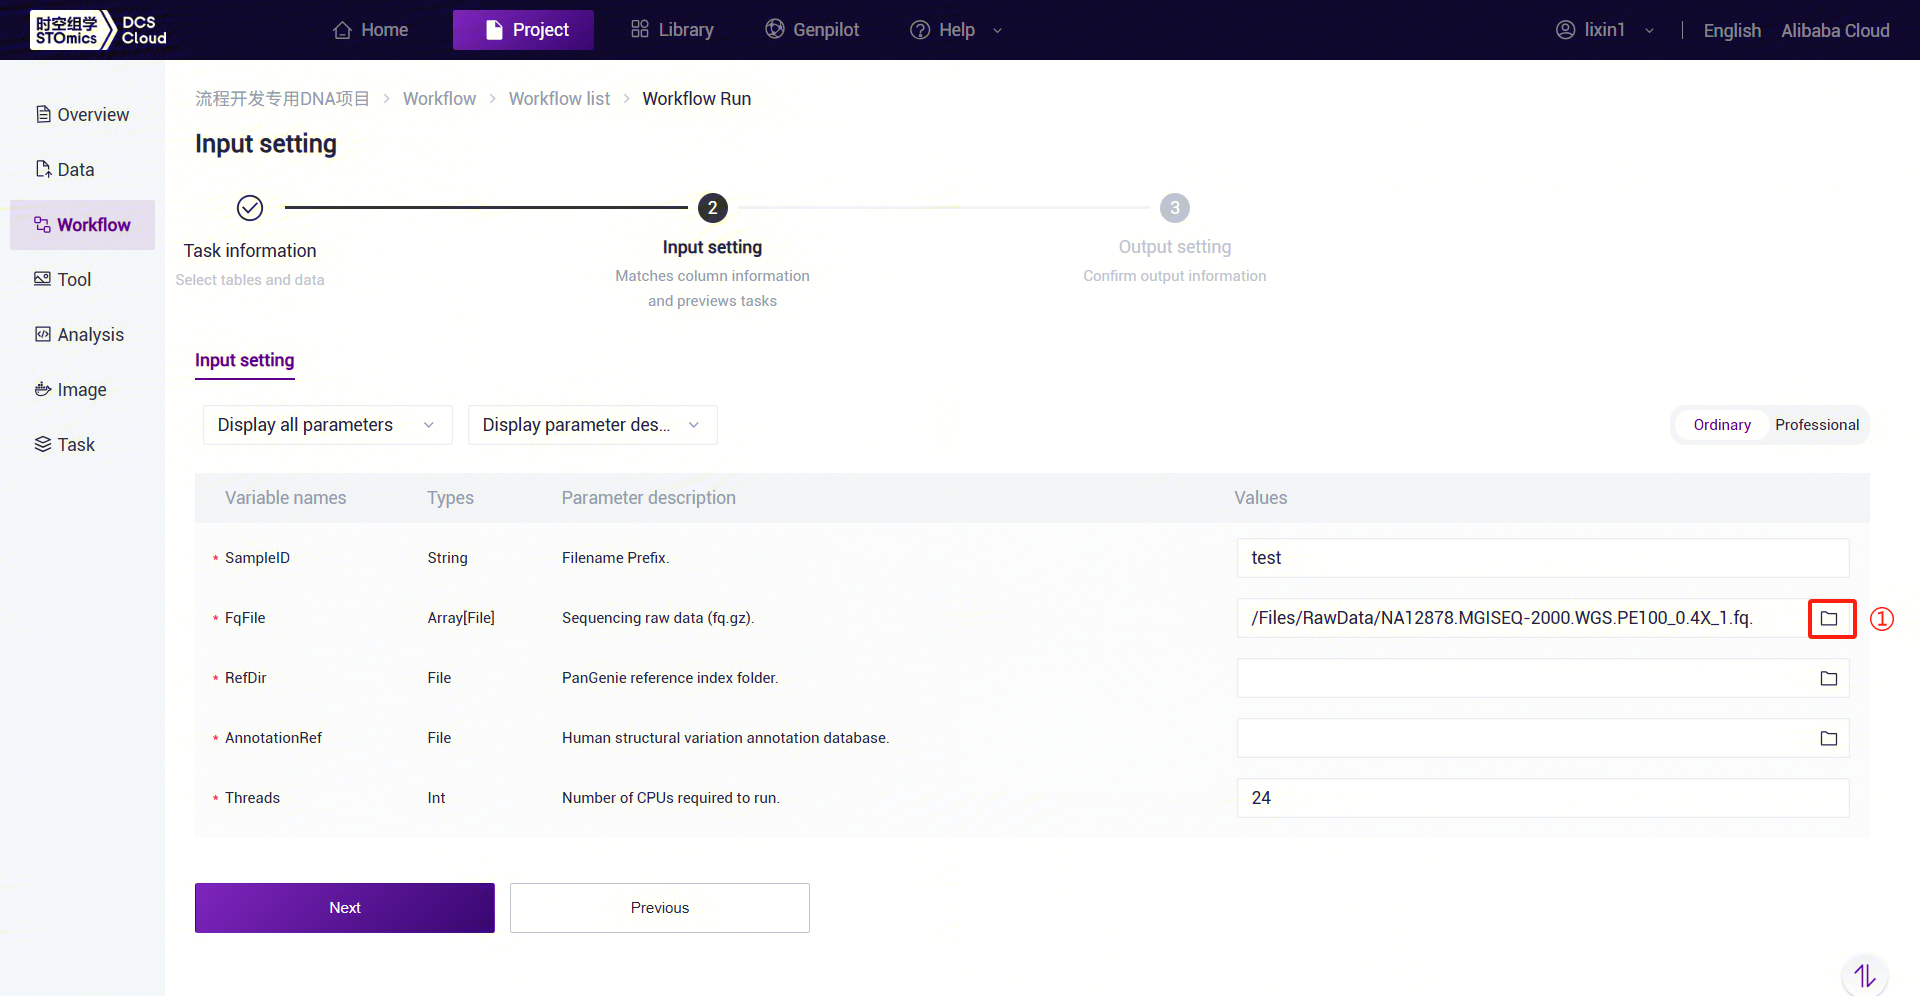
Figure 3-30 PanGenie_WGS_SV Analysis Step 5 (3) PanGenie_WGS_SV: Enter the PanGenie reference genome folder. Click the folder icon under the RefDir parameter to enter the data management page and select the PanGenie reference genome folder.
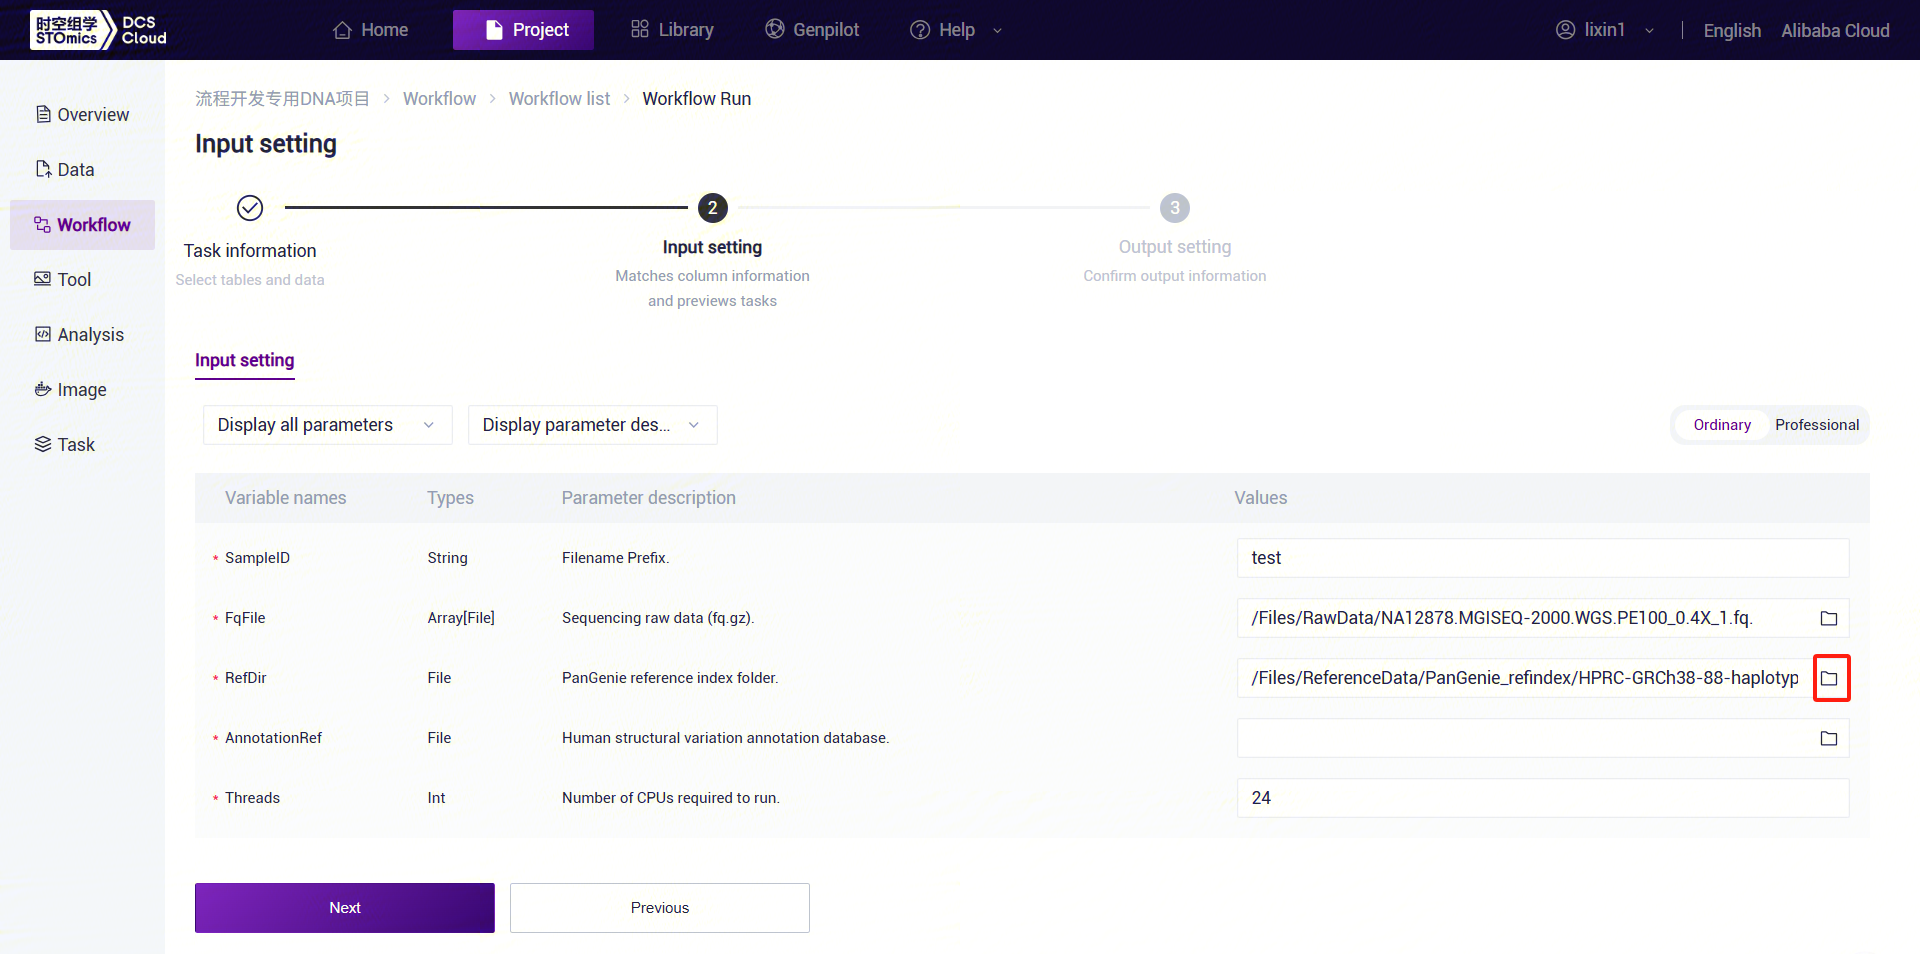
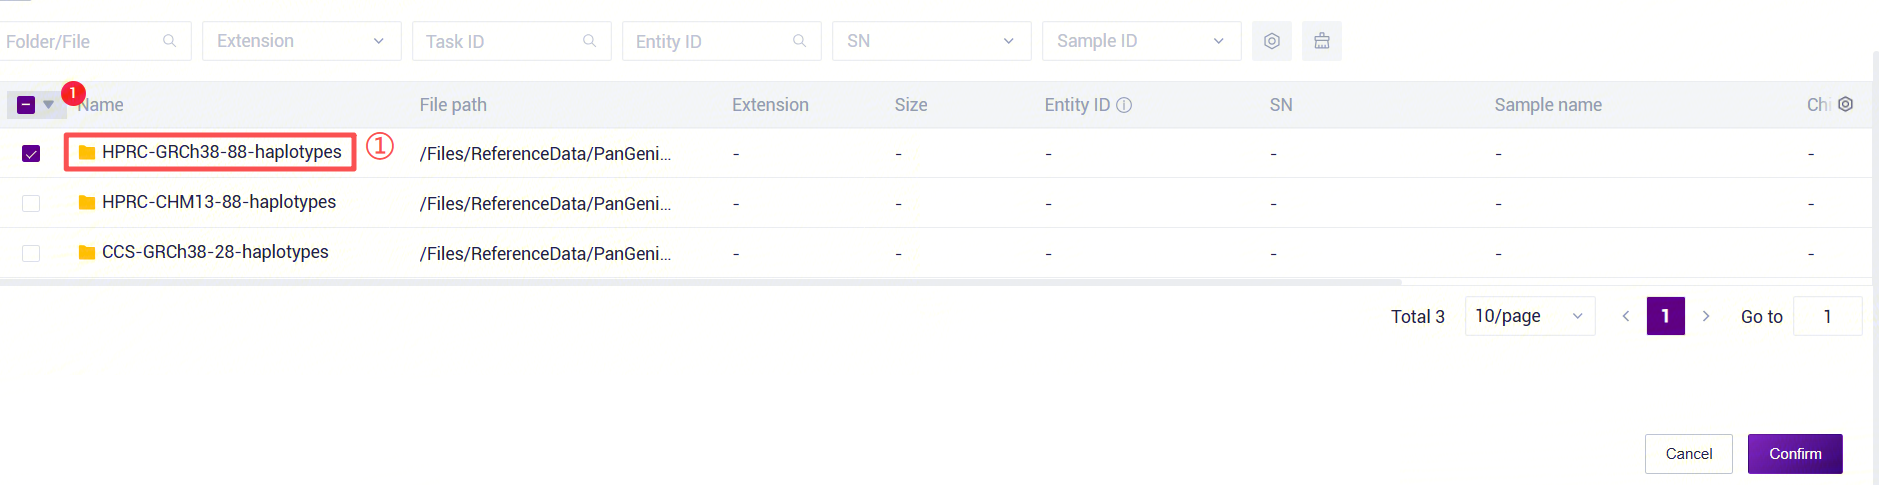
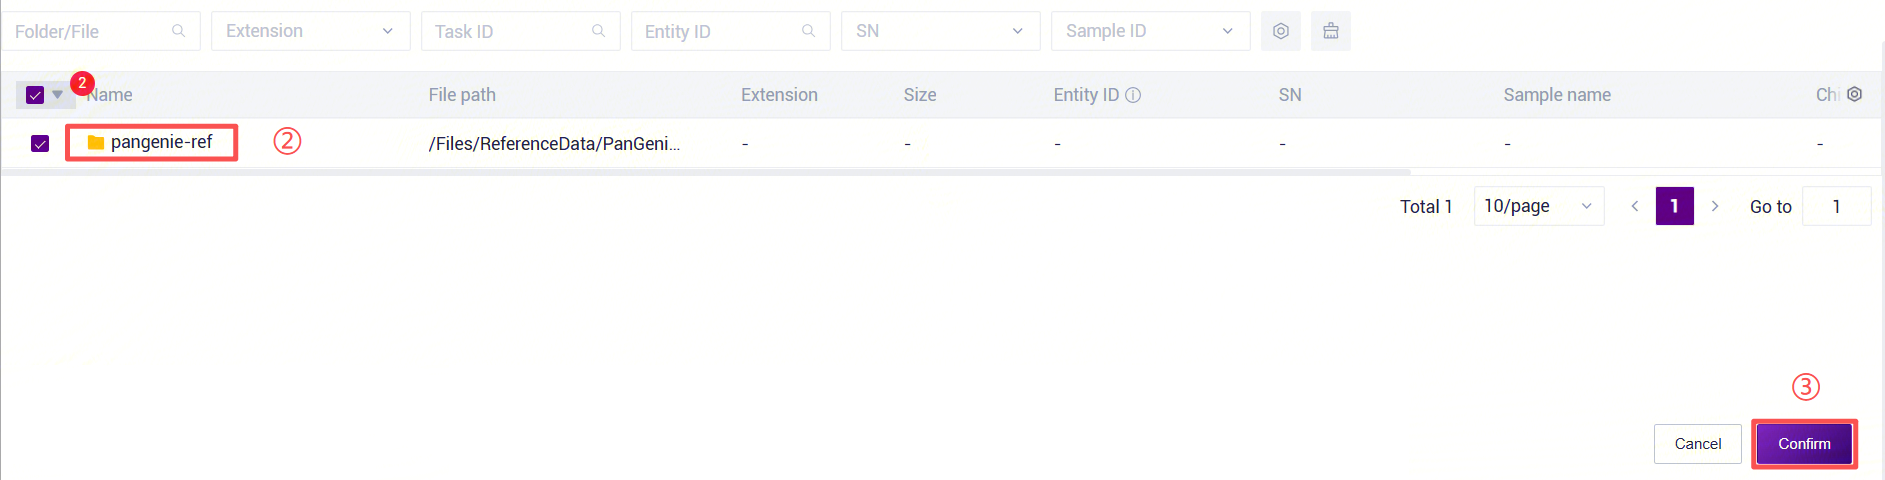
Figure 3-31 PanGenie_WGS_SV Analysis Step 5 (4) PanGenie_WGS_SV: Enter the human structural variant annotation database folder. Click the folder icon under the AnnotationRef parameter to enter the data management page and select the human structural variant annotation database.
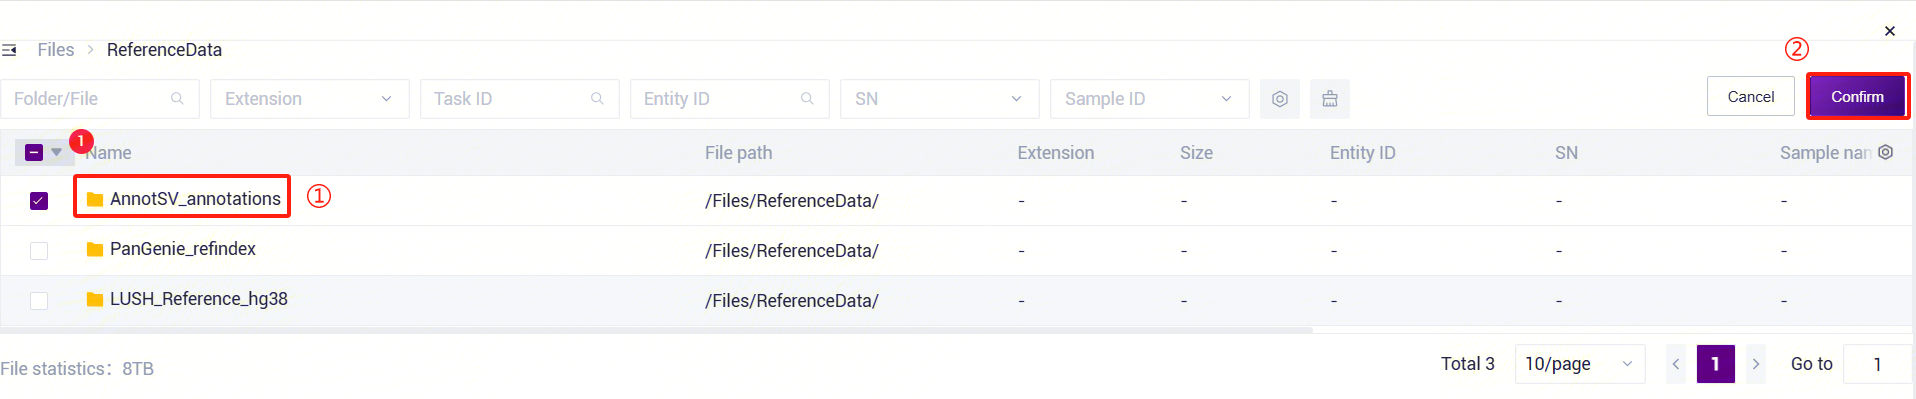
Figure 3-32 PanGenie_WGS_SV Analysis Step 5 (5)
PanGenie_WGS_SV Parameter Description:
- SampleID: Sample name or unique ID, default is the same as the Entity ID.
- FqFile: Sequencing file.
- RefDir: PanGenie reference genome file.
- AnnotationRef: Human structural variant annotation database.
- Threads: Number of CPU cores for the task.
Click [Run] to start the analysis and wait for the output (Figure 3-33):

Figure 3-33 PanGenie_WGS_SV Analysis Step 5 (6)
3.6 Use Case 5: Manual Submission of CNVpytor_WGS_CNV Workflow
The CNVpytor_WGS_CNV workflow is a CNV detection and analysis workflow based on CNVpytor, used to detect and analyze copy number variations (CNVs) from sequencing data. CNVpytor inherits the core engine of its predecessor and extends visualization, modularity, performance, and functionality. Additionally, CNVpytor utilizes B-allele frequency (BAF) likelihood information from single nucleotide polymorphisms (SNPs) and small insertions/deletions (indels) as additional evidence for CNVs/copy number aberrations (CNAs) and primary information for copy number-neutral loss of heterozygosity.
3.6.1 Step 1: Input Data
When performing LUSH_Germline_FASTQ_WGS_Human analysis, set the OutputSortMarkdupBam parameter to true to output the aligner BAM file.
3.6.2 Step 2: Add Workflow
Similar to Use Case 1 (Manual Submission) Step 2, search by workflow name (refer to 3.2.2 Step 2: Add Workflow).
3.6.3 Step 3: CNVpytor_WGS_CNV Analysis Workflow
Click the left navigation bar [Workflow] to enter the workflow analysis page. Enter
CNVpytor_WGS_CNVin the search box and click [Run] (refer to 3.2.3):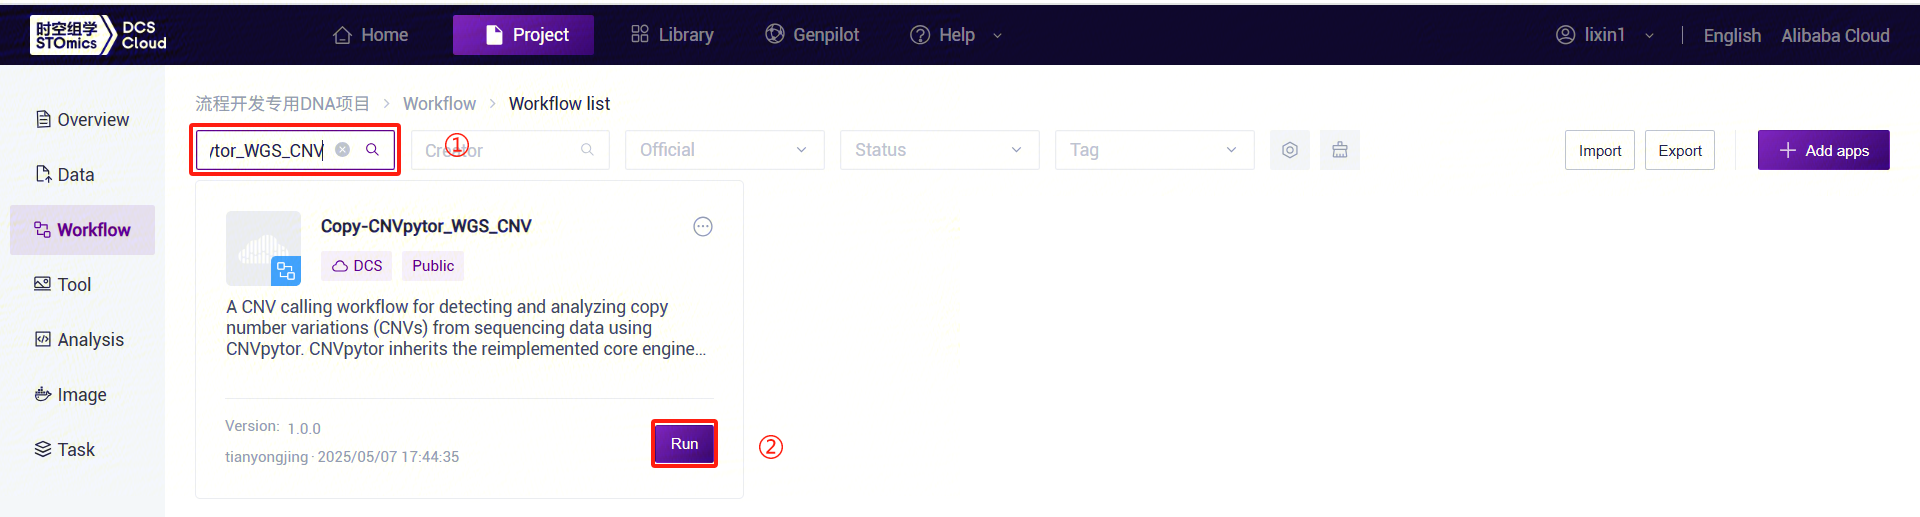
Figure 3-34 CNVpytor_WGS_CNV Analysis Step 3 (1) Enter the entity ID (usually the sample ID) and click [Next] (refer to 3.2.3):
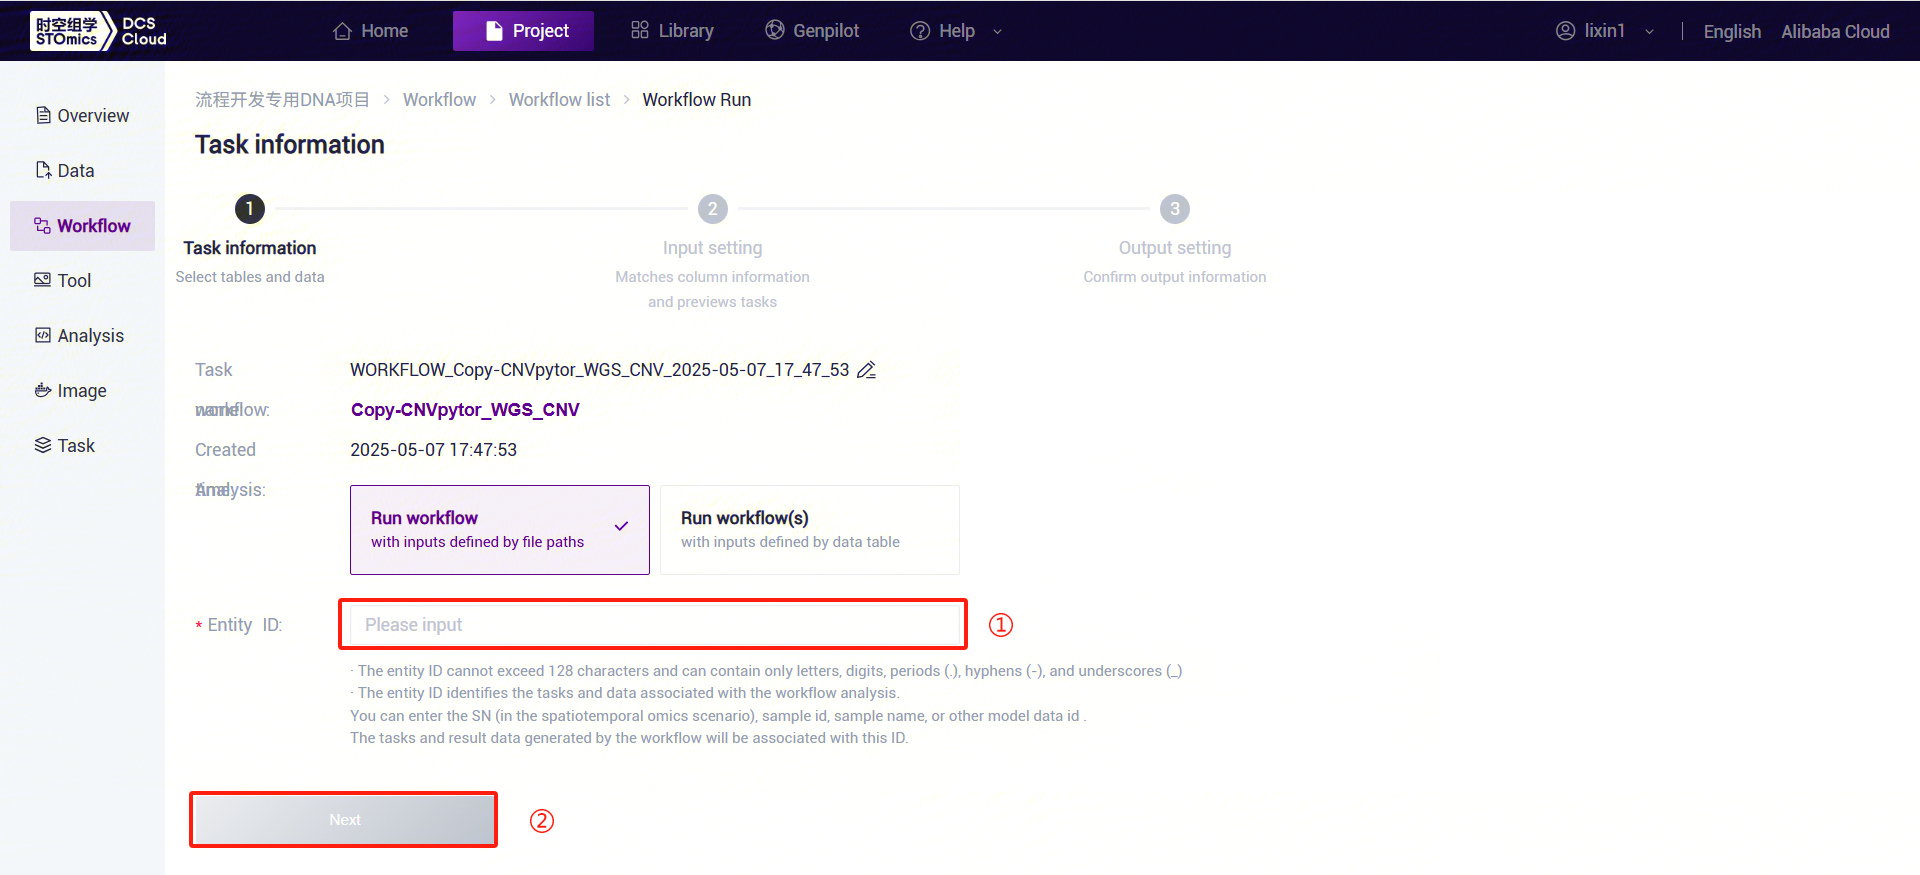
Figure 3-35 CNVpytor_WGS_CNV Analysis Step 3 (2) Click the folder icon under Bam to enter the data management page and select the BAM file.
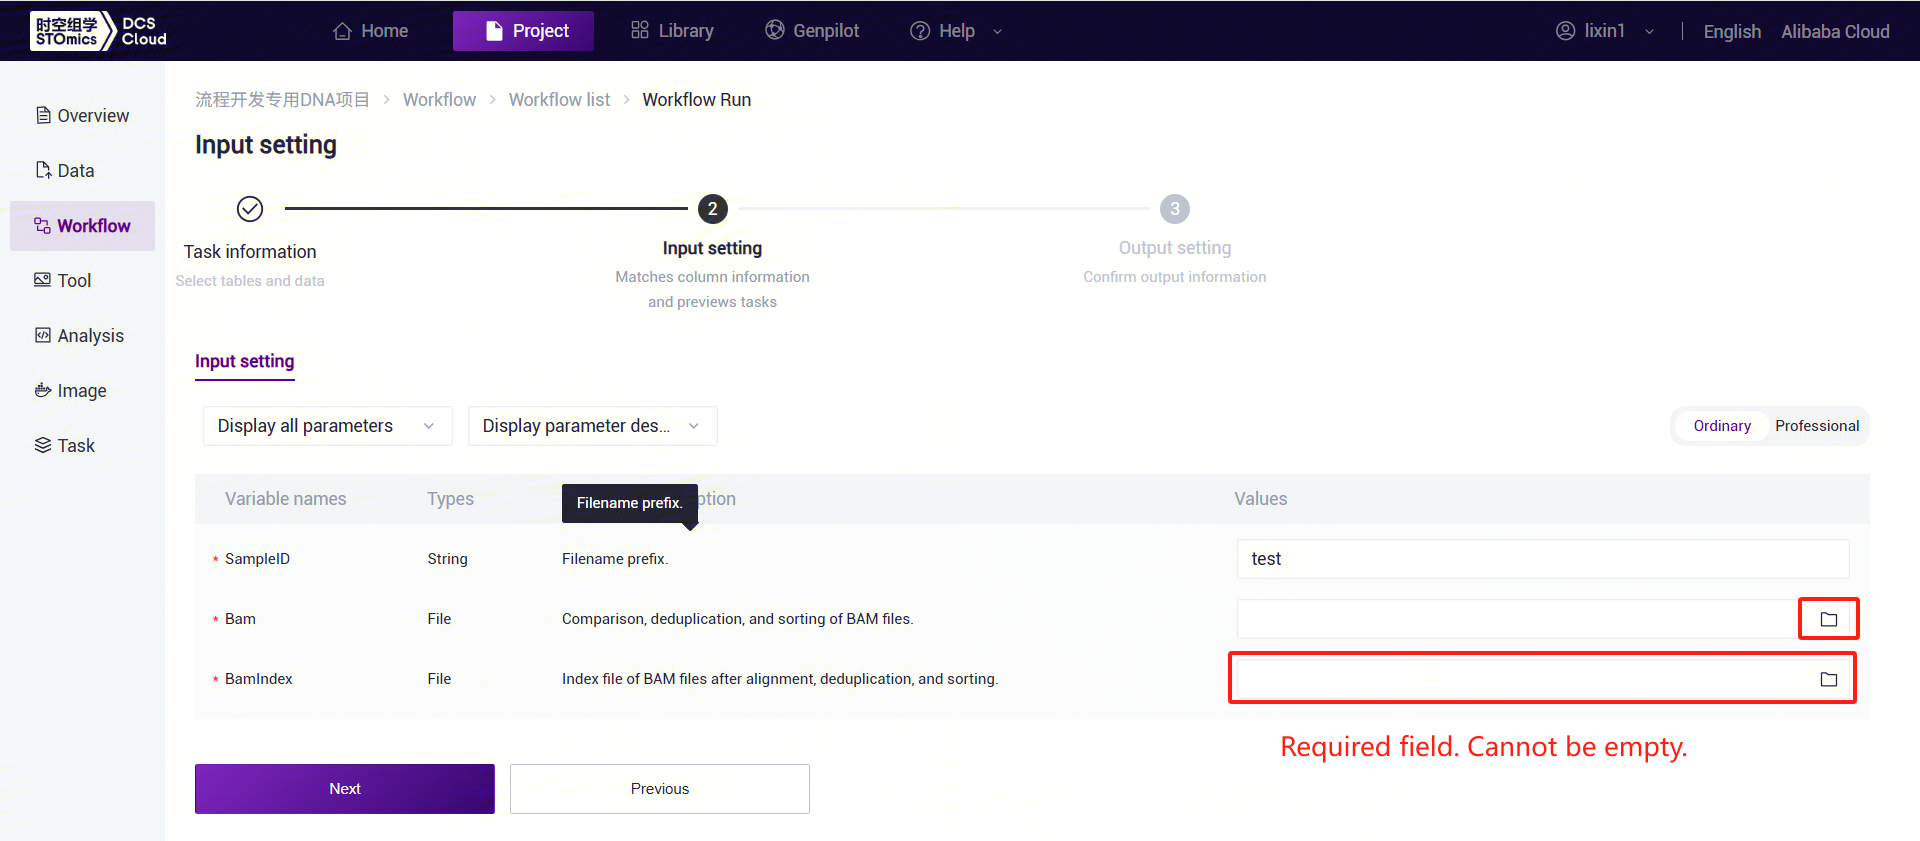
Figure 3-36 CNVpytor_WGS_CNV Analysis Step 3 (3) Click on the folder icon in BamIndex to enter the data management page and select the index file for Bam.
CNVpytor_WGS_CNV parameter description:
- SampleID: Sample name or special ID, which is consistent with the Entity ID by default;
- Bam: The aligned, deduplicated, and sorted bam file;
- BamIndex: The index file for the aligned, deduplicated, and sorted bam file;
Click[Run] to start the analysis and wait for the results to be output (Figure 3-37).
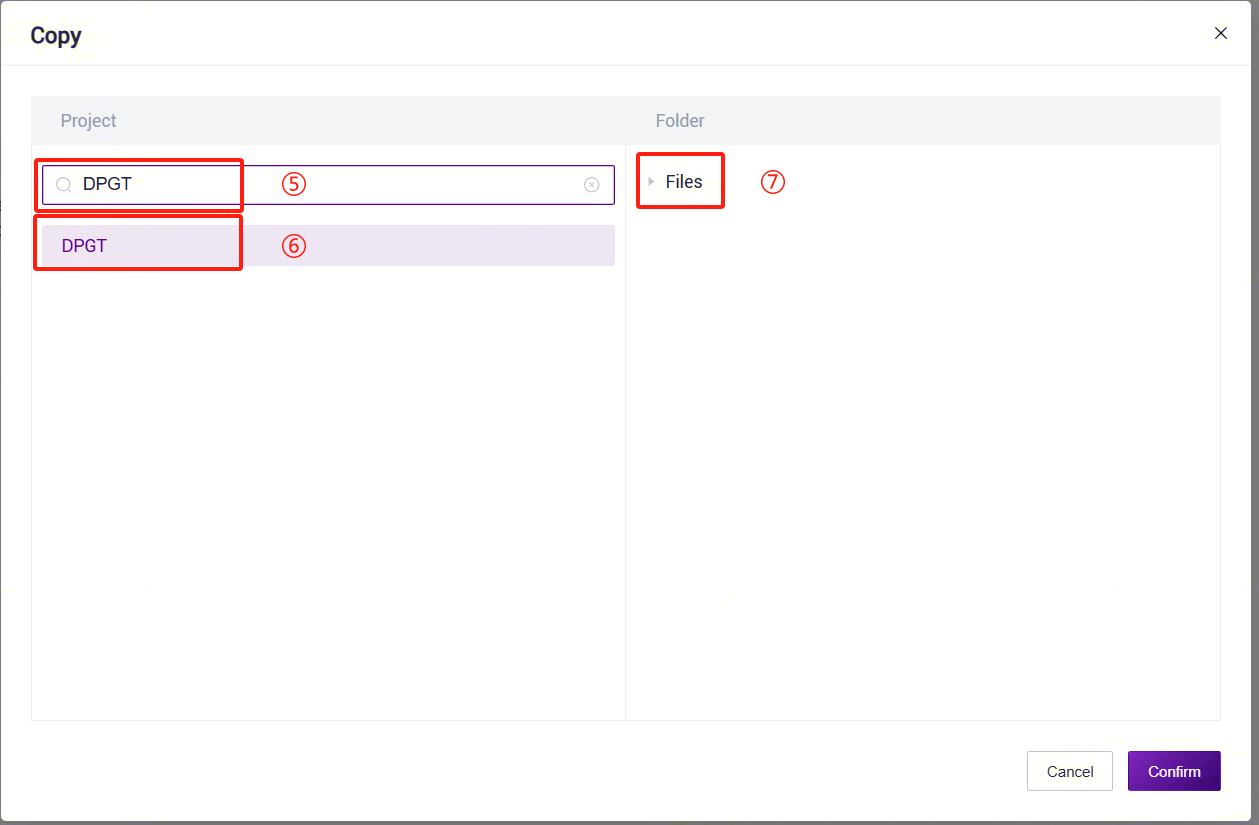
Figure 3-37 CNVpytor_WGS_CNV Analysis Step 3 (4)
3.7 Use Case 6: Table Submission (Using LUSH_Germline_FASTQ_WGS_NHS as an Example)
The operation includes five steps: upload data, add workflow, download table template, fill and import the table, and start the analysis. After importing the sample template, tasks can be run in batches. When the task status shows ![]() as completed, the task is finished, and results can be viewed (refer to Section 3.4).
as completed, the task is finished, and results can be viewed (refer to Section 3.4).
3.7.1 Step 1: Upload Data
Same as Use Case 1 (Manual Submission) Step 1 (refer to 3.2.1 Step 1: Upload Data).
3.7.2 Step 2: Add Workflow
Same as Use Case 1 (Manual Submission) Step 2 (refer to 3.2.2 Step 2: Add Workflow).
3.7.3 Step 3: Download Table Template
Click the left navigation bar [Data], select [Table] - [Download] (Figure 3-38). Click [**Data model template **] and download the
LUSH_Germline_FASTQ_WGS_NHS_V1.0.0template (the template forLUSH_Germline_FASTQ_WGS_HumanisLUSH_Germline_FASTQ_WGS_Human_V1.0.0):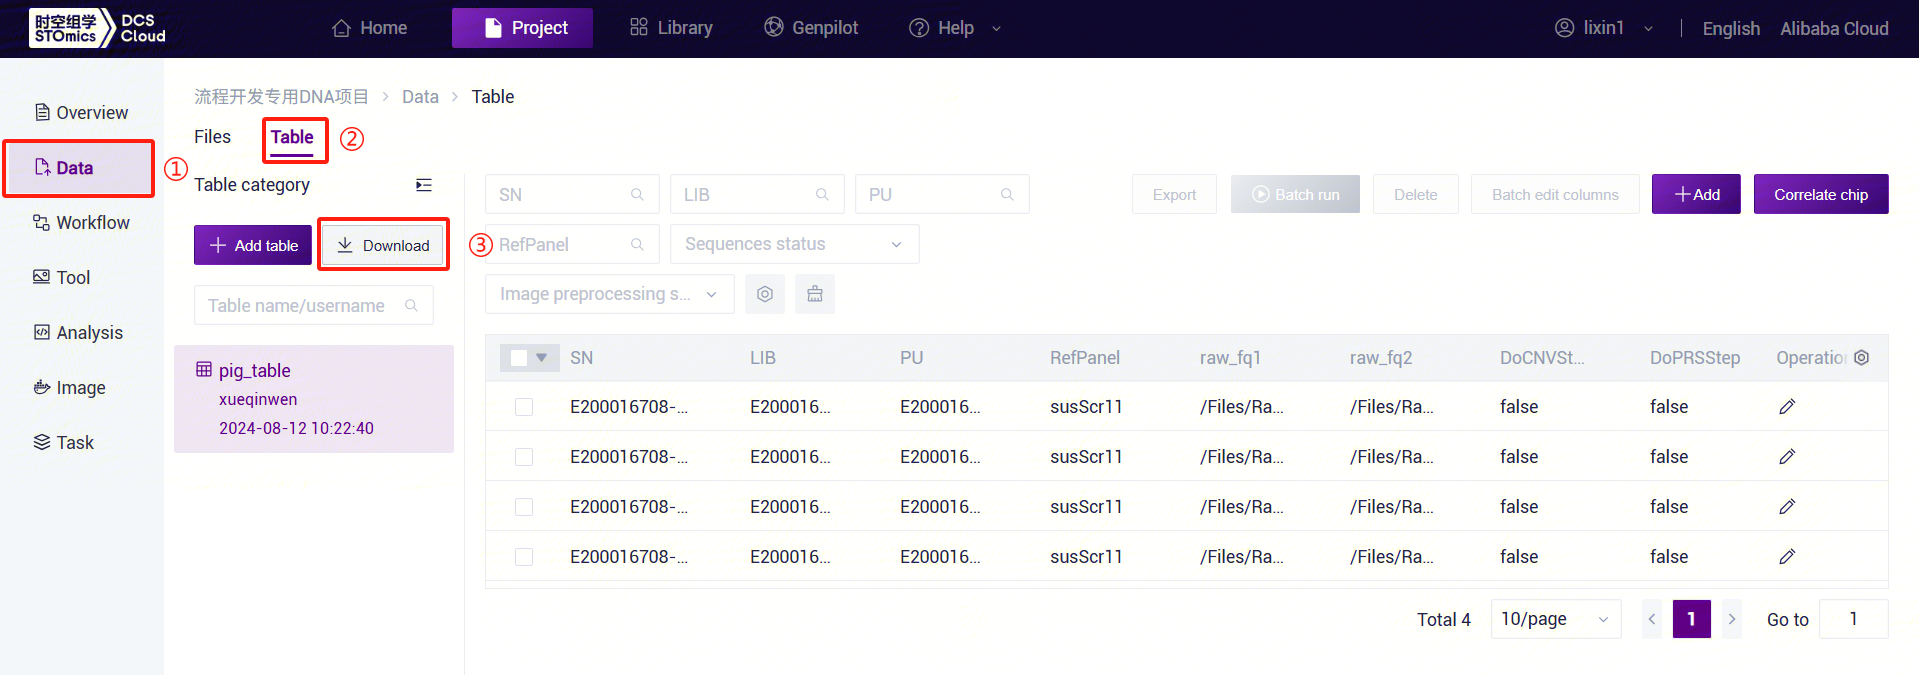
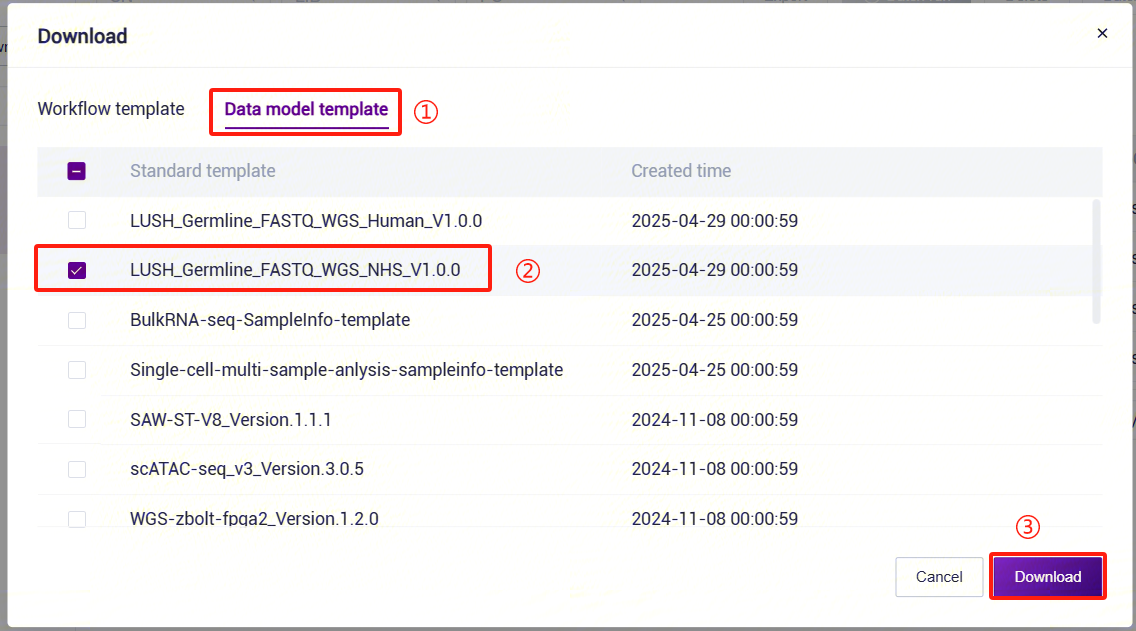
Figure 3-38 Sample Template Download The opened sample template Excel is shown in Figure 3-39:

3.7.4 Step 4: Fill and Import the Table
- Under this use case, the imported table must include a worksheet. This scenario indicates that the analysis begins directly after importing the table for already sequenced sample data.
::: important
- The imported file path must already exist on the cloud platform.
- Do not merge cells in Excel, and avoid spaces or special characters before or after cell content.
- Sample analysis entry (Figure 3-40): :::

After configuring the table template, return to the [Data]interface. Click [Table] - [+ Add table] (Figure 3-41):
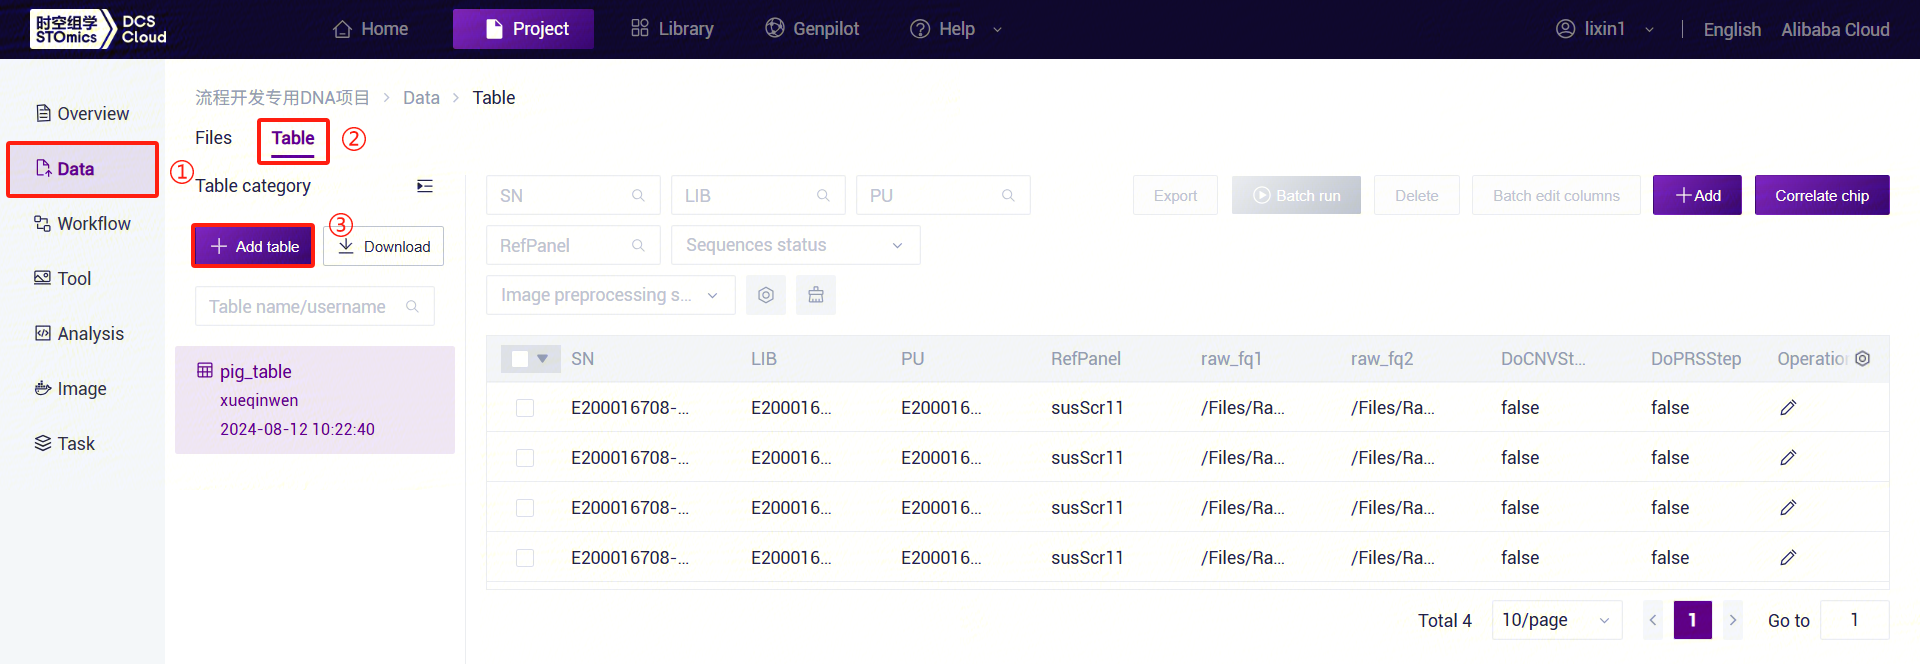
Figure 3-41 Table Import Step 1 Click [Click to upload / Drop here] to browse and select the table with filled sample information, then click [Confirm] (Figure 3-42). After uploading, the file will be displayed in the target folder:
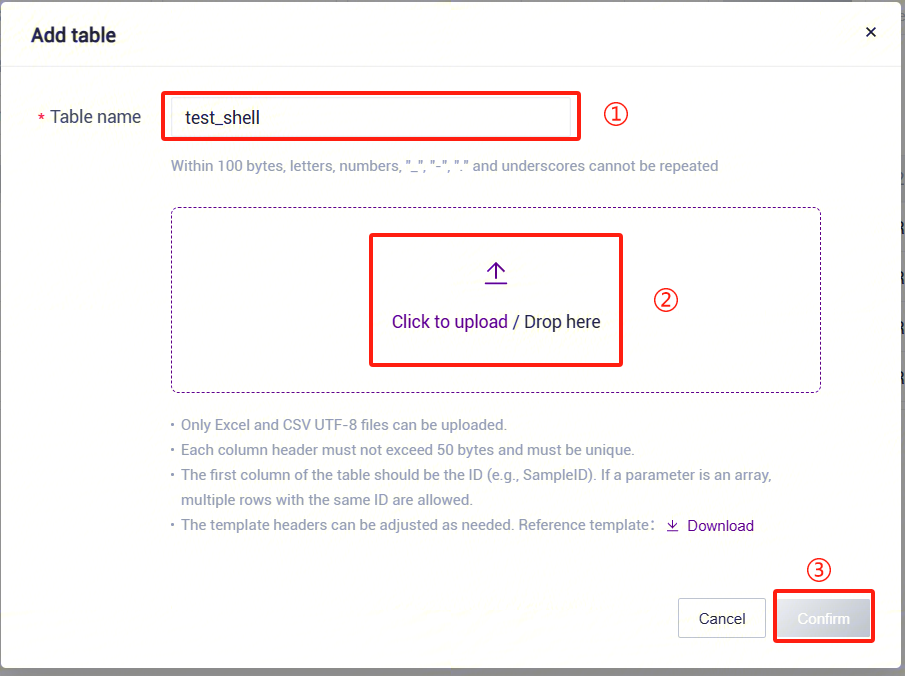
Figure 3-42 Table Import Step 2 Click the navigation bar [Workflow] to enter the workflow analysis page. Enter
LUSH_Germline_FASTQ_WGS_NHSin the search box and click [Run].Select Run workflow(s), click Please Select Table
 , select the table imported in Step 3 above, choose the required rows, and click [Next] (Figure 3-43):
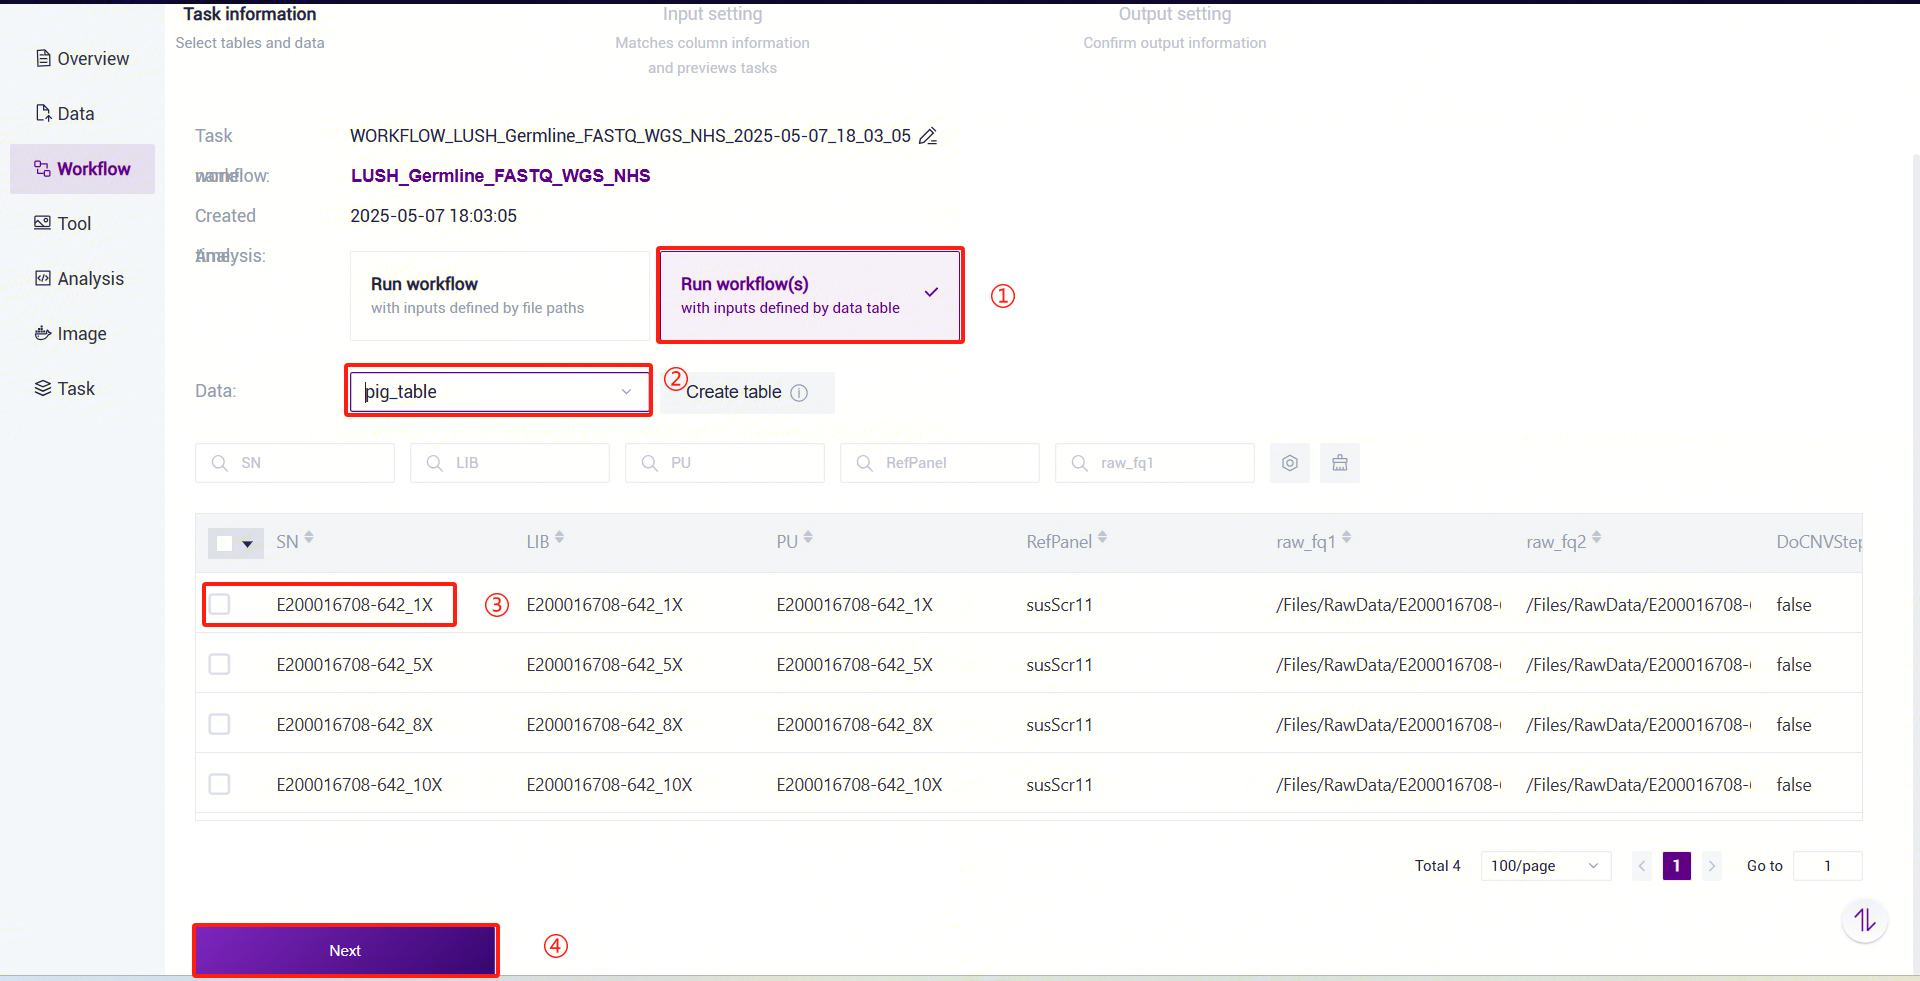
Figure 3-43 Table Import Step 4 Under Value, click
and select the corresponding value. For example, for FASTQ, select ${FASTQ1}and${FASTQ2}. Note that${FASTQ1}and${FASTQ2}must be selected in order (Figure 3-44):
Figure 3-44 Table Import Step 5 Enter sample information, then click [Next] to ensure the parameter settings are correct (Figure 3-45):
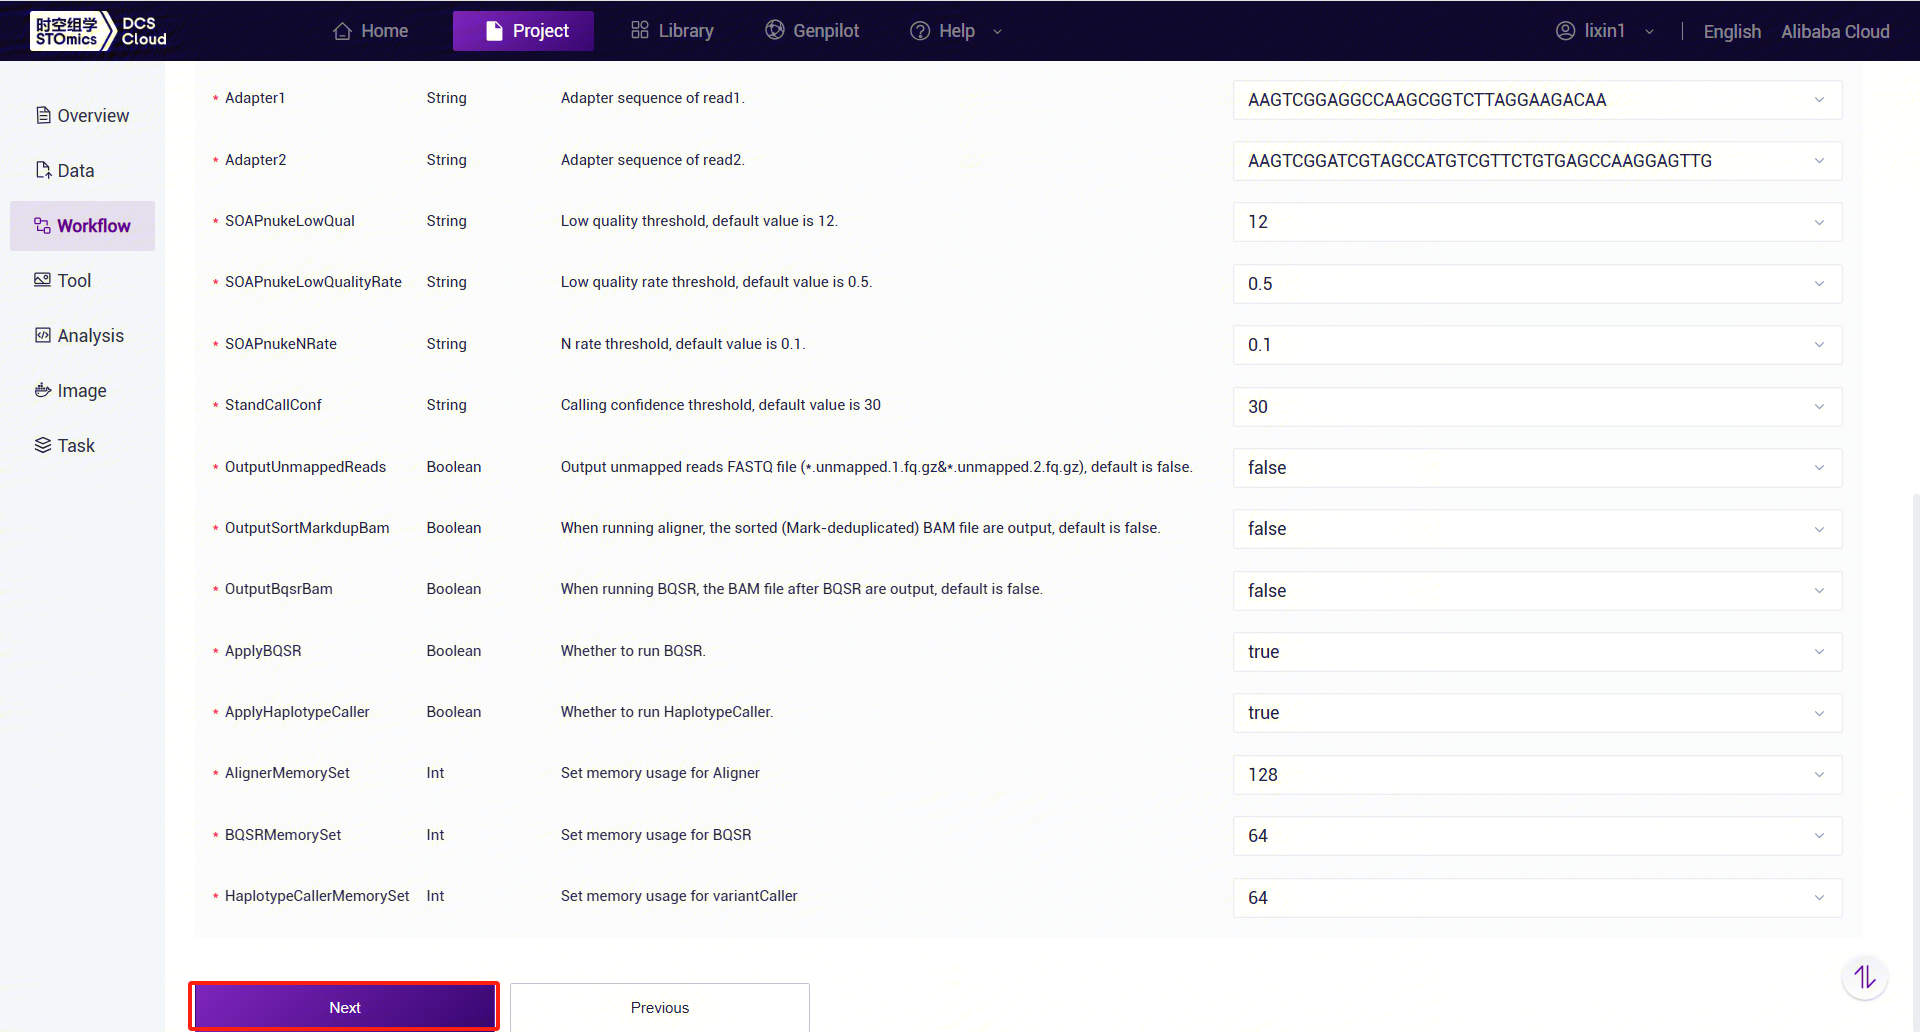
Figure 3-45 Table Import Template
3.7.5 Step 5: Start Analysis
Click [Run] to start the analysis (Figure 3-46):

3.8 LUSH Result Files
3.8.1 Result File Download
Click the left navigation bar [Task] to enter the task management page. Select
LUSH_Germline_FASTQ_WGS_NHSunder Workflow Name to view the task status. When the task is completed, the status will show as completed, indicating the task is finished. Copy the Task ID (Figure 3-47):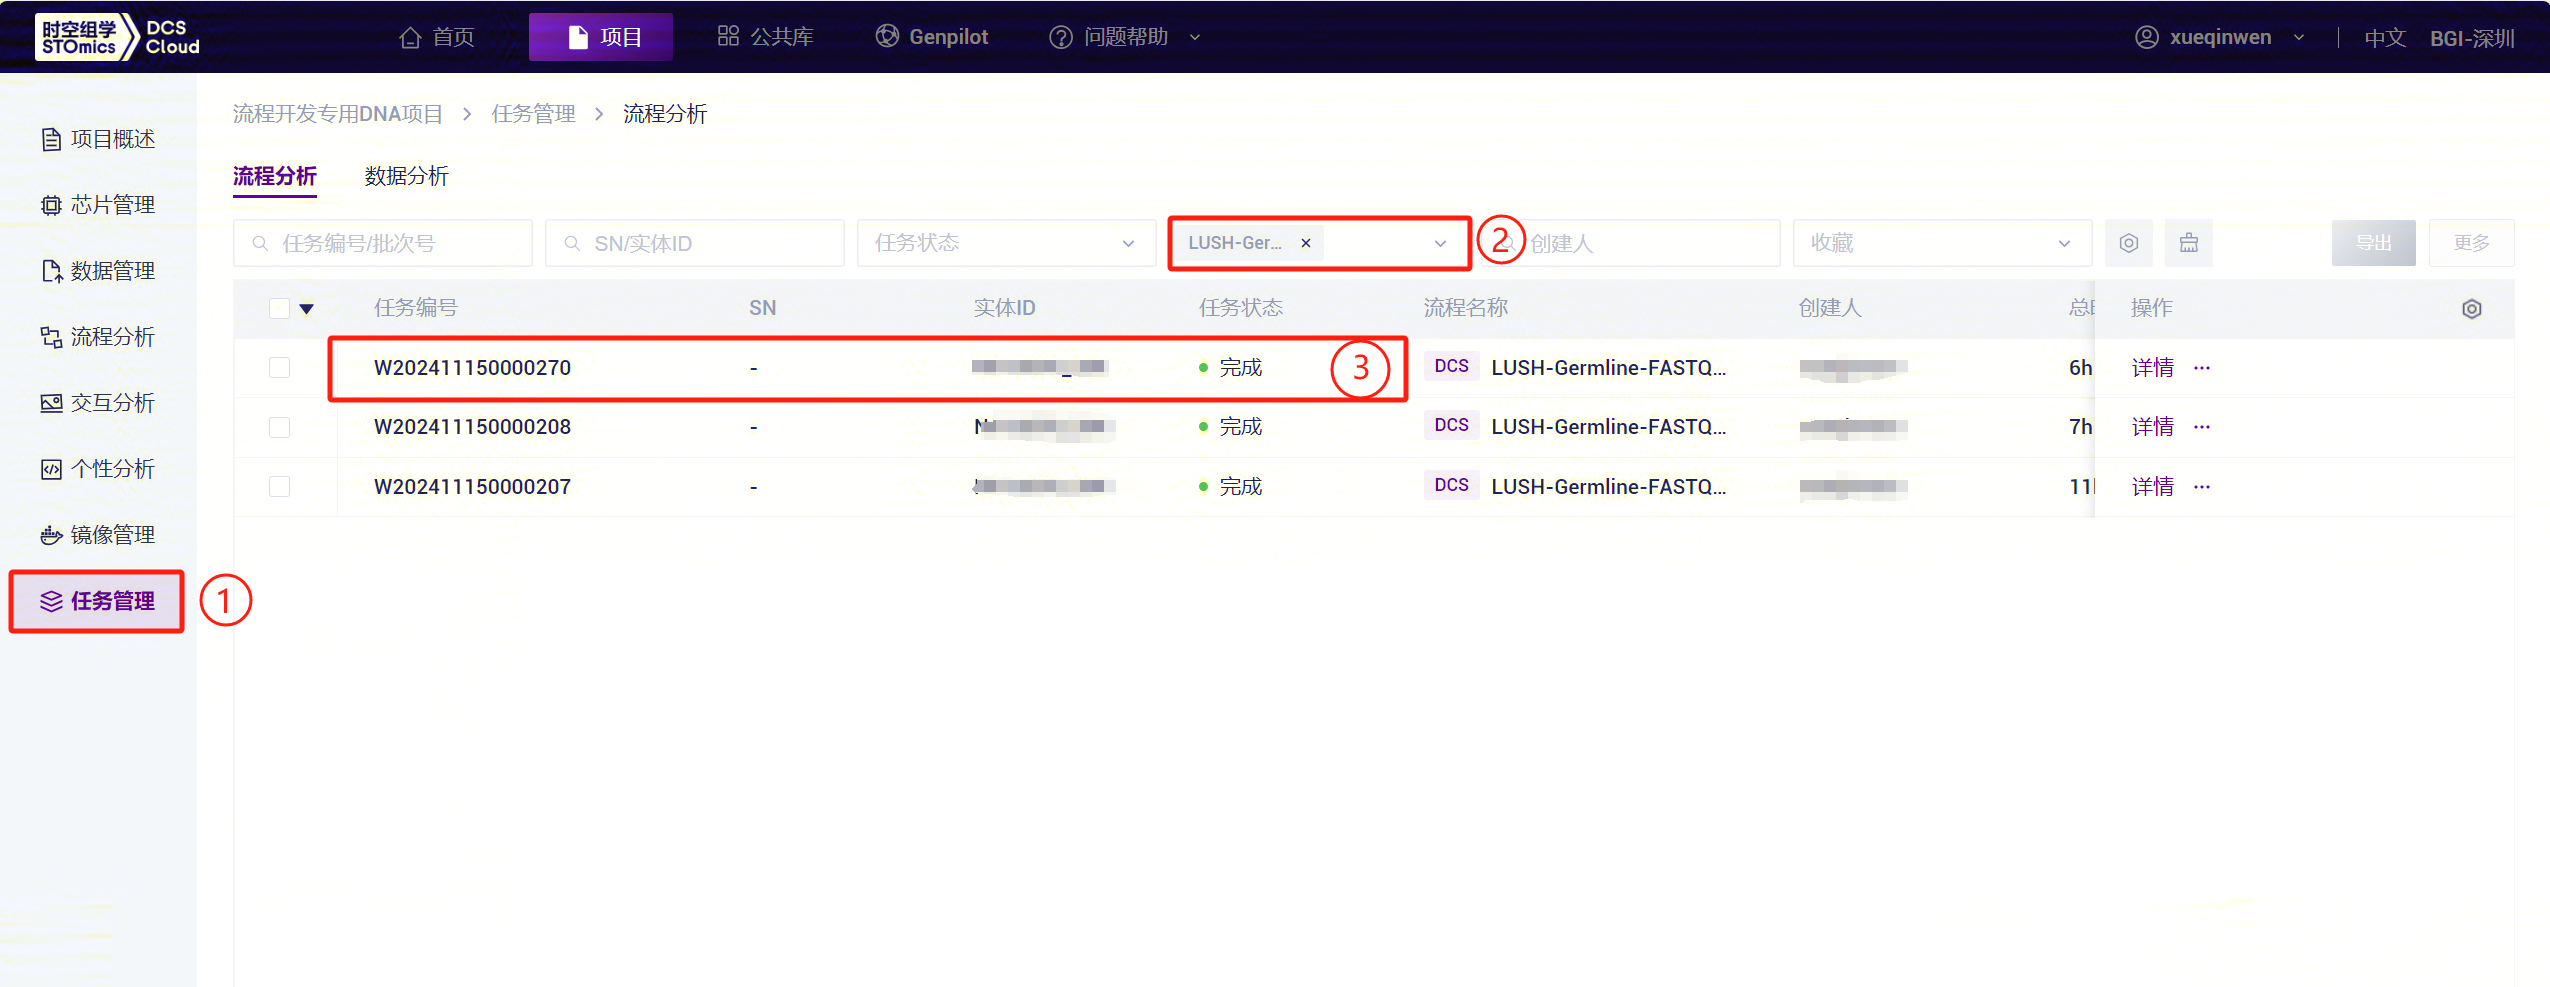
Figure 3-47 Result View and Download Step 1 Download the Ossutil tool zip file (for the first‑time use). 3.Extract the downloaded zip file and double‑click to open the Ossutil tool, entering the tool interface. 4.On the cloud platform file page, select the files you want to download, click the "Download ‑ Tool download" button, then click "Generate download command," and finally click "Copy command." Paste the copied command into the tool interface. The files will be automatically downloaded to the current folder.


3.8.2 LUSH WGS Analysis Workflow Result Files
Upon successful execution, the following directory tree will be generated in the output directory:
├── sample.genotyper.vcf.gz
├── sample.genotyper.vcf.gz.tbi
├── sample.g.vcf.gz
├── sample.g.vcf.gz.tbi
├── sample.unmapped.1.fq.gz
├── sample.unmapped.2.fq.gz
├── QC
│ ├── Base_distributions_by_read_position_1.txt
│ ├── Base_distributions_by_read_position_2.txt
│ ├── Base_quality_value_distribution_by_read_position_1.txt
│ ├── Base_quality_value_distribution_by_read_position_2.txt
│ ├── Basic_Statistics_of_Sequencing_Quality.txt
│ ├── Distribution_of_Q20_Q30_bases_by_read_position_1.txt
│ ├── Distribution_of_Q20_Q30_bases_by_read_position_2.txt
│ ├── output_filter_files_report.txt
│ └── Statistics_of_Filtered_Reads.txt
└── report
├── sample.AT.xls

├── sample.bamstat.xls

├── sample.base.png

├── sample.cumuPlot.png

├── sample.fqstat.xls

├── sample.histPlot.png

├── sample.insertsize.png

├── sample.qual.png

├── sample\_report\_cn.html

├── sample\_report\_en.html

└── sample.vcfstat.xls
Directory Description:
| sample.*.vcf.gz* | Variant detection results and index. |
|---|---|
| sample.unmapped.*.fq.gz | Reads files that failed to align to the reference genome. |
| QC | Quality control and filtering results. |
| report | Workflow result reports. |
| report/sample _ report__en.html | English version of the sample analysis report. |
| report/sample _ report__cn.html | Chinese version of the sample analysis report. |
| report/sample.fqstat.xls | Statistics for quality control results. |
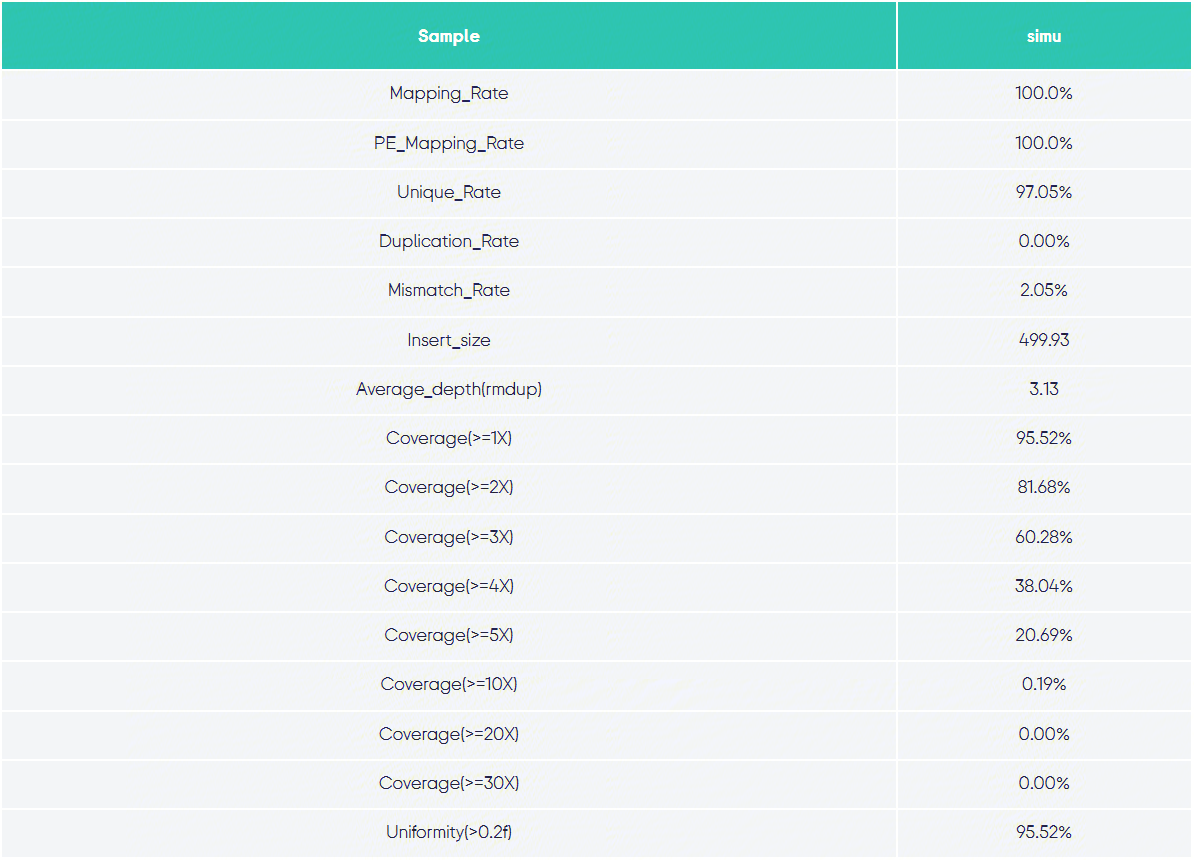
| report/sample. bamstat.xls | Statistics for alignment results. |
| report/sample.vcfstat.xls | Statistics for variant results. |
| report/*.png | Images for the report. |
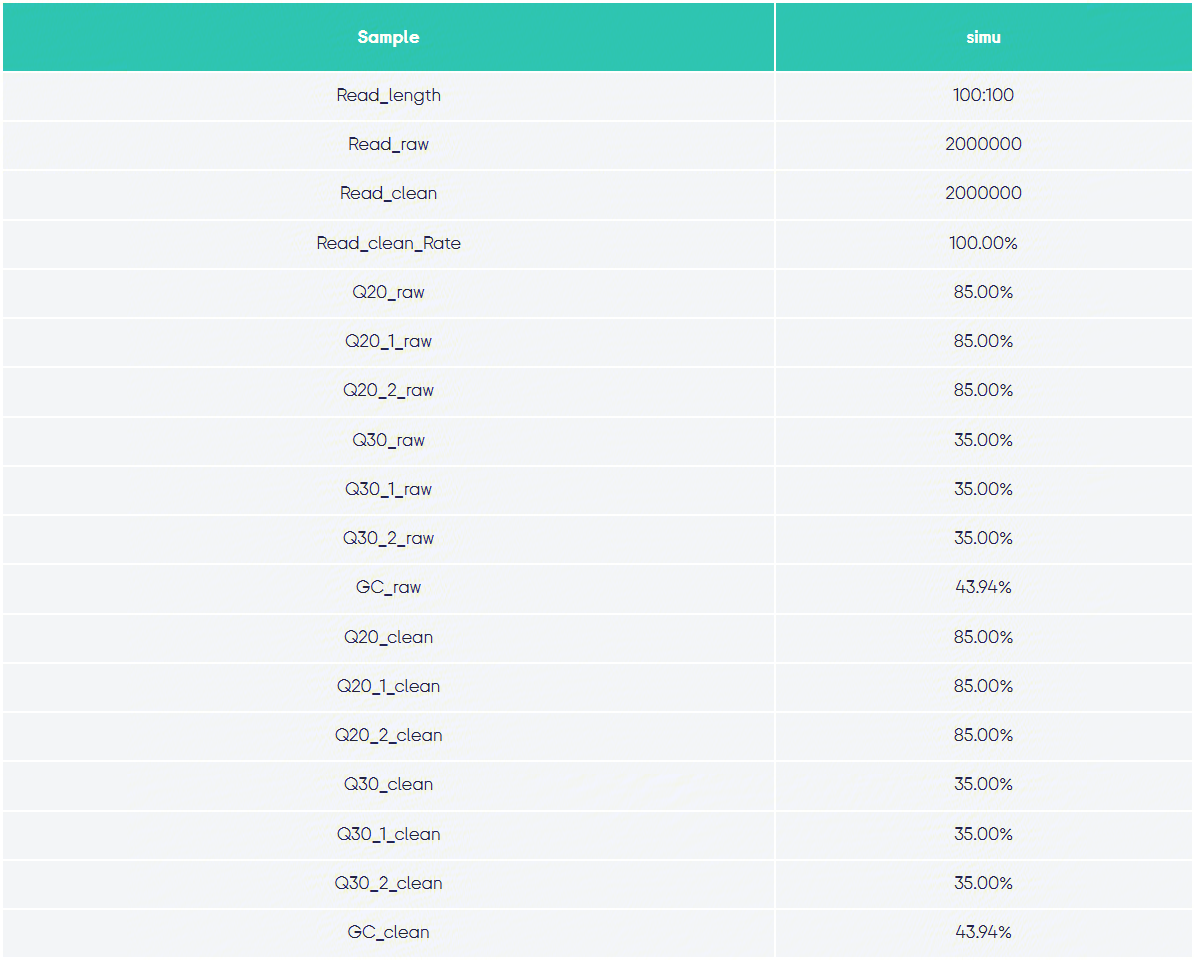
Statistical Results Display:
Quality Control Statistics:
b1.png Alignment Statistics:
Variant Statistics:

3.8.3 ExpansionHunter_WGS_STR Analysis Workflow Result Files
Upon successful execution, the following directory tree will be generated in the output directory:
└── STR
├── sample.json

├── sample\_realigned.bam
└── sample.vcf
Directory Description:
| File | Description |
|---|---|
sample.json | JSON file containing sample parameters and summarized analysis results by locus. |
sample_realigned.bam | BAM file containing realigned read data. |
sample.vcf | VCF file containing STR positions and information. |
3.8.4 PanGenie_WGS_SV Analysis Workflow Result Files
Upon successful execution, the following directory tree will be generated in the output directory:
├── circos.png
├── circos.svg
├── sample_AnnotSV
│ └── sample-pangenie-genotyping-biallelic-filtered-sv.annotated.tsv
├── sample-pangenie-genotyping-biallelic-filtered-sv.vcf.gz
├──sample-pangenie-genotyping-biallelic-filtered-sv.vcf.gz.tbi
├── pangenie-biallelic
│ ├── sample-pangenie-genotyping-biallelic.vcf.gz
│ └── sample-pangenie-genotyping-biallelic.vcf.gz.tbi
├── pangenie-results_genotyping.vcf
├── pangenie-results_histogram.histo
└── sv_type_counts.txt
Directory Description:
| File/Directory | Description |
|---|---|
sample.*.vcf.gz* | Variant detection results and index; -filtered contains only SV information. |
sample-pangenie-genotyping-biallelic-filtered-sv.annotated.tsv | Results file containing SV genotyping and annotation information. |
pangenie-results_genotyping.vcf | SV variant detection results in pan-genome format. |
sv_type_counts.txt | SV statistics. |
*.png, *.svg, *.histo | Statistical images and plotting data. |
3.8.5 CNVpytor_WGS_CNV Analysis Workflow Result Files
Upon successful execution, the following directory tree will be generated in the output directory:
cnv_results/
├── cnv_type_counts.txt
├── sample.CNV.call.txt
├── sample.CNV.manhattan.global.0000.png
├── sample.CNV.rdstat.stat.0000.png
└── out.pytor
Directory Description:
| File | Description |
|---|---|
cnv_type_counts.txt | CNV statistics. |
sample.CNV.call.txt | Results file containing CNV information. |
sample.CNV.manhattan.*.png | Manhattan heatmap. |
sample.CNV.rdstat.stat.*.png | Read depth (RD) analysis statistics. |
out.pytor | CNVpytor file (HDF5 format). |